Saturday, November 29, 2008
Every Saturday, Timothy Adam Designs features a different shop on his blog and promotes it on his Twitter channel. Well this week, he's featuring my shop!
Go here to see his blog and the Saturday Super Shop Feature.
Many, many thanks, Timothy.
Of course, please stop by his Etsy shop, where he has modern unique jewelry, art, furniture clocks jewelry displays and much more.
Friday, November 28, 2008
Google Adsense vs Project Wonderful. A comparison after 1 week of advertising.
12 comments Posted by Contrariwise at 9:20 AM
The experiment
I had heard so much about both Google Adsense and Project Wonderful. Supposedly you can generate revenue from your blog. They sounded interesting so I decided to try them. (Everyone else seems to be using them!)
And while I was at it, why not make a little project of it and compare how they do.
It was easy to get Adsense on my blog. Blogger has widgets that allow you to put ads on your side bar. You do have to apply for an account and it took one day to be approved. The ads are related to the content of the blog. So you can see that the ads in my blog are about jewelry, jewelry findings, or silver. (Although an occasional bizarre one tends to creep in.) Adsense has a disadvantage in that the ads are in text only. The maximum number of ads I can have on my blog is 3.
It took about 4 days for me to be approved by Project Wonderful as a publisher. (They review the content of blogs and require a minimum number of posts. ) To be fair in this experiment, I decided to have the same number of ads as Google Adsense: 3.
Stats: Clicks per ad
Revenues from Adsense are based on number of clicks per ad, which differs from Project Wonderful where advertisers pay by the day, instead of by the click.
In the 1st week, there were 2 clicks on Google Adsense ads. (Not exactly on fire, are they?)
It's not as easly to figure out total number of clicks per ad for Project Wonderful. Ads can be on my blog for seconds or for days. Some ads have gotten as many as 12 clicks, some have gotten none.
Stats: Page Views
Per Project Wonderful, the displays per ad have ranged between 550 to 990 displays per day. My page views have averaged about 650 per day for the past 5 days.
Stats: Revenues
Bottom line. After 1 week
Adsense: 2 clicks and $0.16
Project Wonderful: $2.26
I haven't figured out how Google Adsense determines payment per click. How much you earn depends on a number of factors including how much an advertiser bids on your site -- you'll receive a portion of what the advertiser pays.
The Project Wonderful ad spots on my blog have floating prices, they can rise or fall depending to the willingness of advertisers to place bids. In the past week, it's pretty much ranged between $0.09 to $0.30 per day.
Bottom line.
Obviously, I must blog for the love of it. It's definitely not for the money.
Do you want to subscribe to my blog by email? Click here!.
Would you like to be a Contrariwise follower? (I love having more friends!) All you have to do is click on the link in the upper right on my side bar.
Thursday, November 27, 2008
Happy Thanksgiving to all!
Today, I thought I would feature a few of the many Thanksgiving-related creations on Etsy. Each image is linked to the corresponding Etsy shop. Just click on it to bring you there.


EatonWeb Blog Directory
Wednesday, November 26, 2008
Yesterday I wrote about some criticism that I received from a fellow jewelry maker about writing jewelry tutorials and giving away "trade secrets".
I want to thank everyone for the wonderful support I received from you. Wow. You guys rock!
Why do I write tutorials? I guess I like to share. Sometimes it's taken a long time to figure out how to do a certain technique and I've learned it through trial and error. I'm proud when I finally master it, and I want to share. Perhaps in doing so, people won't have to make the same mistakes I made.
AND it give me a great feeling when someone finds my work inspiring and my tutorials useful.
So I want to share with you an e-mail I got a couple of days ago. Jozie took the time to write this wonderful message to me, which made my day. THIS is the reason I write tutorials.
I got a follow-up message from her that she just listed her first pair of wire earrings. Please go check them out at her shop, Jewelry by Jozie.
Do you want to subscribe to my blog by email? Click here!.
Would you like to be a Contrariwise follower? (I love having more friends!) All you have to do is click on the link in the upper right on my side bar.
Tuesday, November 25, 2008
I don't know if you remember, but earlier this year, I posted a tutorial on how to wrap briolette beads.
I just recently got an interesting e-mail from a fellow jewelry maker. She said that wrapping briolettes was information that she worked hard to discover herself and that it was hard-earned; she was upset that I was sharing it. She called me out on her blog, too.
Well do you know what I say. Knowledge is worthless unless it is shared. It's not a commodity to hoard.
Furthermore, ANYONE can figure out how to wrap beads. Most bead magazines have instructions. Plus it's easy enough to find by googling.
So in as a response to her letter, I am re-posting my tutorial, below.
Good luck to all my fellow beaders and jewelry makers, and I hope your briolettes turn out BRILLIANTLY!
The Contrariwise Method to wrap briolettes and tear-shaped beads
Supplies:
Instructions:
1)Thread the wire through the bead's hole, making it poke out about an inch on one side.
2)Pinch both wires at the top of the briolette to form the shape of a triangle, making sure that the stone is centered
3) Take the short end and wrap it around the longer wire 2-3 times, like this:

4)Snip off the tiny bit of wire sticking out.
5)Using your round pliers, create a loop:

(You could actuall stop here, finish with a wrapped loop, and be done. But we'll continue with wrapping the wire down the gemstone.)
6)Now start wrapping the wire. You will wrap around the wire below the loop, then wrap around the bead. You can stop wrapping above the hole in the bead or below it, depending on the look you want. In this case I wrapped below the hole.

7) At this point you need to decide how to finish this off. There are a number of ways:
- Cut the wire flush and either tuck it under the last wrap or press it neatly against the stone.
- Wrap the wire back up the bead carefully, then secure it by tucking it into the bead hole or wrapping it a couple of times under the loop. (If you want a "messy" look, wrap the wire back up loosely.)
- To create a swirl in front of the bead, cut the wire, leaving about 1/2 inch. Then create the swirl and press it against the bead. Example:

- Wrap the wire back up once accross the front of the wrapping, then a couple of times below the loop. (My preferred method). Example:

And that's all there is to it! Happy wire wrapping!

Of you'd like to become a follower of my blog, just click on Contrariwise followers in the upper right of this blog and become one of my posse.
If you'd be interesting in subscribing to my blog and receiving it by e-mail, just click Subscribe to Contrariwise ramblings by Email.
Monday, November 24, 2008
 Did you ever click on an image in a blog to get a better look? I know I have. Sometimes nothing happens. But sometimes the click takes you to a larger version.
But did you know that you can link your image to a webpage? So that when you click on the image you get transported to who-knows-where?
For example. Click on the photo on the right. Where does it take you?
Yes, I've just shamelessly used the photo as a marketing tool.
How do you do this on blogger? It's easy.
Click on the icon that allows you to insert an image. That should bring up a familiar screen where you choose your image and layout. Place your image where you want it in your post.
Then, in the Compose tab, click on the photo once to select it. Then click on the link tool.
Insert the address and...Voila! Your image is linked!
As you saw, I linked the image directly to my Etsy shop. You can link the photo to a corresponding item in your shop (which I've done before and could directly attribute more views to it from my post). But if your item sells, then you have to remember to update your link.
Do you want to subscribe to my blog by email? Click here!.
Would you like to be a Contrariwise follower? (I love having more friends!) All you have to do is click on the link in the upper right on my side bar.
Saturday, November 22, 2008
And now, an inspirational message for all of us:
(I wonder what's really in those vitamins.)
Do you want to subscribe to my blog by email? Click here!.
Would you like to be a Contrariwise follower? (I love having more friends!) All you have to do is click on the link in the upper right on my side bar.
Friday, November 21, 2008
Friday downloads, Nov 22: Crafts,Tutorials, and More!
15 comments Posted by Contrariwise at 12:01 AMOnce again it's my weekly download. A collection of wonderful stuff I found on the web this past week.
How to make CD cases from paper
If you're like me, you have tons of CDs lying around, littering the desk and in drawers. The kids use them for school, we have CDs that we burn stuff on, and then the sprinkling of audio CDs. (Mom still buys those, although they're like dinosaurs, doomed to eventual extinction.) Most of them without any covers. I've bought cute little plastic covers, but I run out of them quickly. Plus they're p-l-a-s-t-i-c.
Well, here's a way of keeping our CDs unscratched, giving ourselves an opportunity to use our creativity, and staying GREEN, all at the same time!
You can EASILY make your own CD covers with paper!
How To Make A CD Cover Using A4 Paper - The top video clips of the week are here
I mean, how simple is this and why haven't I thought of it before!
You can add personal touches and your creativity to them. For example, design, print or xerox any arty label you want... glue them on - or use rubber stamps, silkscreen, linoluem cut print... whatever.
 You can also use different paper - scrapbooking papers, pieces of wallpaper, handouts you received in class (or work) that you would otherwise throw away.
Marlie's Creative Universe suggests using magazine ads. These create a really nice graphic look. Plus it's a really good re-use of something on hand, that would either be going to recycling or possibly -gasp!- the trash.
Additional info on how to make them is here.
Empty House makes his out of brown paper lunchbags. They're even easier to make than those from sheets of paper and I really like the almost industrial look. They have a lot of potential for personalization, too.
 If you want to print the contents of the CD on the cover, you can use this website to create a PDF file which can be printed on a regular piece of paper, then folded to create a paper CD case.
How to bind your own books
Binding books can seem intimidating
 because it usually requires specialized tools and costly supplies. But Craftynest has a tutorial that's an easy and inexpensive way to bind books—and it requires minimal specialized tools. Plus you can make these books any size you want and the supplies are recycled things from around the house, cereal boxes and scraps of paper.
I even found a site that had instructions on how to turn an e-book into a paperback-sized book! With a little creativity you can create books with glossy color covers that are hard to distinguish from a store-bought books.
There are lots of websites that have books in the public domain that can be downloaded for free! (For one, try Project Gutenberg .) Download one of these and bind with a special cover - what a fun gift that could be!
You don't just have to limit yourself to printing e-books. If you have a manuscript you have written, it is easy to set the page formatting in your word processor and print our your own book.
...And More!
 Fingerprint Wedding bands
Jeweler Andrew English has designed wedding bands which are hand-engraved with the fingerprint of the partner so that they're completely unique to each couple. They're only available by commission and come in 9, 14 and 18ct white/yellow/rose gold and platinum.
The bands are available in a number of styles with the fingerprint hand-engraved on either the inside or outside of the band. (Somehow I just find the idea of having your partner's fingerprint engraved on the inside of the wedding band terribly romantic and beautifully understated.)
Taking your obsession for cake making to the next higher level
All you see below are cakes that can be eaten without any part of it left. No plastics or any other artificial stuff is being used - everything is eatable. All this cakes by Zhanna from St. Petersburg.I just chose a few examples. For more incredible cakes, go here.


I have to admit, I’m a little disturbed by this last cake with beer, fish and newspapers in the decoration. I'm just hopin the frosting fish still doesn't tastes like what it looks like.
Do you want to subscribe to my blog by email? Click here!.
Would you like to be a Contrariwise follower? (I love having more friends!) All you have to do is click on the link in the upper right on my side bar.
Thursday, November 20, 2008
 Just thought I'd share a couple of new pieces in my shop. Both were made this week
The first are these Hoops Within Hoops. (It's my temporary name, so please forgive it. If you want to suggest a better one, I'd appreciate it.)
If you're a regular reader of my blog, you'll know that I recently learned how to solder. And I've been having lots of fun since. These earrings are the result of me having fun soldering rings of sterling wire.
Instead of just single rings of sterling for each hoop, I wanted to have multiples.
The earrings turned out almost exactly like I envisioned them. Except for one thing:
I originally planned to have the rings be perfectly smooth circles. But when I made the earrings that way, I thought it was boring. You can buy slickly manufactured earrings at any kiosk at a mall. I wanted to make sure that there was a human element in these earrings. I handmade them, they should have my stamp!
So using my ballpeen hammer, I hammered them dozens of times (although it seemed like hundreds and may well have been!) to give them a more personalized look.
In the process, I found that the textured silver really reflected the light, making these earrings sparkle with every movement. The send pair uses gemstones from the Bead Porn purchase I recently made.
These facetted natural citrine briolettes are the color of warmed honey. They look great all on their own - on my own custom earwires.
And I suddenly realized that they happen to be the November birthstones. I call them "Warm Gold and Cool Silver".
Now what I haven't shown you, is a 3rd pair of earrings I made this week that were a FAILURE. They, of course, haven't been listed in my shop.
As it's been said, the good comes with the bad. You can't expect designs to go right every time. And I'm planning to show you those -and what went wrong with them- in a future post.
Perhaps you'll be able to learn from my errors. Or at least laugh at them.
Check back with me tomorrow. I'll be having my weekly feature: Crafts, Tutorial, and More! It's my opportunity to share with you the best (and oddest) things I've found on the web in the past week!
Do you want to subscribe to my blog by email? Click here!.
Would you like to be a Contrariwise follower? (I love having more friends!) All you have to do is click on the link in the upper right on my side bar.
Wednesday, November 19, 2008
Etsy tips for a better shop: Periodically update your photos and listings
13 comments Posted by Contrariwise at 12:01 AMJust because you've listed an item on Etsy, doesn't mean the listing is carved in stone.
I'll often go through my listings and look for opportunities to improve them or update them.
Let me give you a couple of examples.
Updating descriptions and titles Your listing description shouldn't say that your beautiful handmade item has a lovely pastel palette perfect for Easter - in September!
If you have a seasonal description, you should update it seasonally. The above was a really blatant example, but season descriptions can creep in subtly. Minor changes to make your listing "fresh" can make a difference.
Last Christmas time, I listed the earrings on the left under the name of "Christmas Kisses", complete with a holiday-themed description. I ended up selling quite a few pairs . But I didn't want to stop listing my "Kisses" in my shop - they really can be worn any time of the year. So, after Christmas, I renamed them "Valentine Kisses" and wrote a season-appropriate description.
That worked very well and I did sell several pairs for that holiday.
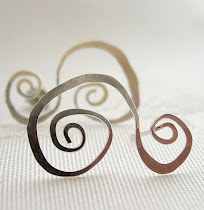
Take opportunities to improve your photos My Dangling Swirl Earrings were originally available in my shop a couple of months ago. Even though I had photographed them several times, I was never happy with the photos. On the right is my original listing photo for them. Yes, they've sold twice and I've relisted them, but I thought the photo needed major improvement.
I was recently playing around with my lightbox - changing the lighting and  experimenting with different backgrounds. I wanted a background that would complement sterling silver. I tried various colors of cardstock, pieces of wood, tiles, different types of stones, etc - then I tried a placemat with rich dark colors. (Placemat??!!) I really liked the deep color and the way silver seemed to pop against it. It also subtly evokes the holiday season.
I went back and took new photos of the Dangling Swirl Earrings and I am so happy I did. You can see the new photo on the left.
Now I feel the photos represent my earrings better - and I don't cringe every time I look at them.
Do you want to subscribe to my blog by email? Click here!.
Would you like to be a Contrariwise follower? (I love having more friends!) All you have to do is click on the link in the upper right on my side bar.
Tuesday, November 18, 2008
I bought some beautiful faceted crystal quartz when I was in Rome recently. I love the way the light hits the many facets and bounces off of them.
I've used them to make some earrings, highlighting them in a herringbone weave made of sterling. (You can see them here.)
But this weekend it suddenly struck me that they would be great as the focal for rings. (Palm hits forehead! Duh!) I made a wire wrap ring, with the intent to oxidize it.
I personally like the antiqued look in jewelry. When I look at photos of jewelry, I'm always drawn to those that are antiqued. The contrast between the highlights and the shadows gives the jewelry interest. But I'm not sure most people like the oxidized look. (I've also heard that a shiny silver usually sells better in shops on Etsy.)
After I finished wrapping the stone, I found I liked the way this ring looked with the bright polished silver. (There it is on the right.)
Shiny shiny shiny. The bright sterling in the same color tone as the quartz.
I could definitely see myself wearing this at Christmas decked out for the holidays - and it sparkling on my fingers. But since I really had planned to oxidize the ring, I went ahead and did it.
On the left is the exact same ring, oxidized and rubbed with fine steel wool to bring out the highlights.
Hmmm. I'm unsure. I thought the oxidized finish would contrast with and bring out the sparkling quartz. But it seems to me that the stone reflects the dark tones more. Not bad, but different than I had imagined.
What do you think? Which do you like better?
Do you want to subscribe to my blog by email? Click here!.
Would you like to be a Contrariwise follower? (I love having more friends!) All you have to do is click on the link in the upper right on my side bar.
Monday, November 17, 2008
Pickle. It's what's for soldering. Also good on sandwiches.
13 comments Posted by Contrariwise at 12:01 AMA funny name, isn't it.
When you solder silver and other metals, they get darkened and crusty. To clean them up, you dunk them in an acidic solution commonly called pickle.
My soldering station is not well set up and I've been putting my pickle in a little glass cup. But it evaporates quickly and I have to make fresh solution frequently.
I decided that the next time I have a good-sized jar that's empty, I'd recycle it and use it to store my pickle.
Guess which jar was next?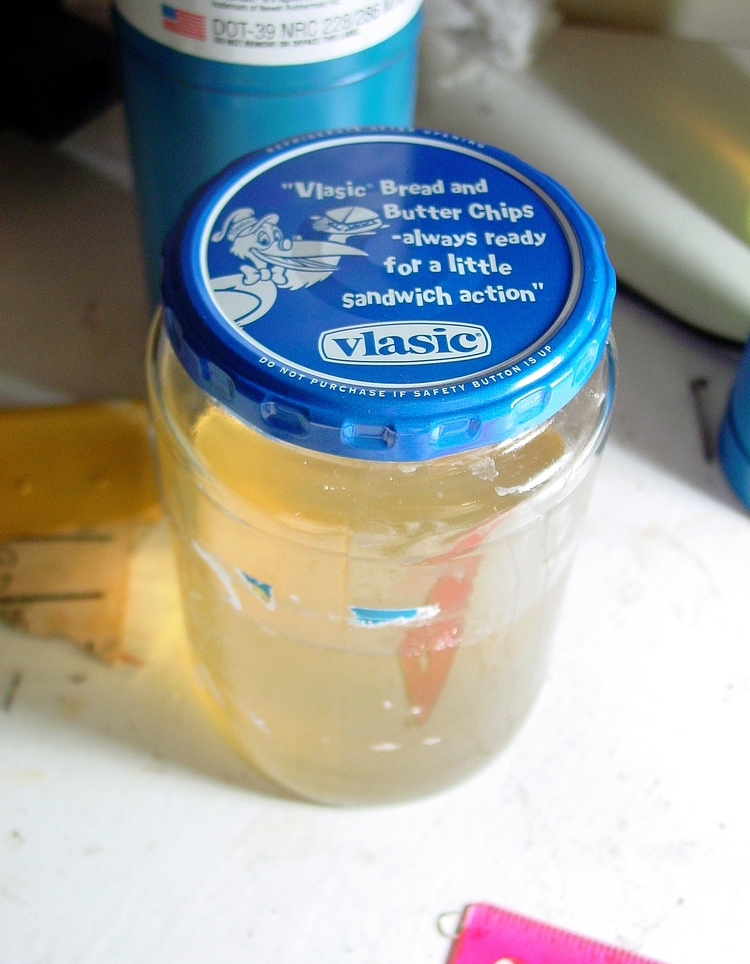
Do you want to subscribe to my blog by email? Click here!.
Would you like to be a Contrariwise follower? (I love having more friends!) All you have to do is click on the link in the upper right on my side bar.
Saturday, November 15, 2008
Ancient Earring is As Beautiful in the 21st century as it was in the 1st.
8 comments Posted by Contrariwise at 12:01 AM
Friday, November 14, 2008
Crafts, Tutorials....
I was a deprived child and never had Shrinky Dinks to play with. (Too dangerous. I might have blown myself up with the gas oven. )
Starting with plastic boxes from strawberries....

....you cut out shapes and sand them lightly...

then pop them into the oven to create cute litle bits like this.

(BTW, she also has an awesome Etsy shop, TyrannyOfTheHandbags. Check it out.)


What the...????

AWK! LITTLE TERRIFYING ECSTATIC FACES, HIDING IN THE TEENY TINY BROCCOLI BITS.

Do you want to subscribe to my blog by email? Click here!.
Would you like to be a Contrariwise follower? (I love having more friends!) All you have to do is click on the link in the upper right on my side bar.