Tuesday, December 16, 2008
The Earth Bazaar is having an end of the year sale and I picked up a few things....some tourmalines, swiss blue topaz, aquamarine, rose quartz, and peridot.
I love their online store. Their regular prices are outrageous, but if you order from their weekly specials, you can get some pretty good deals . And the quality is outstanding. I only order their grade A stones. They're the clearest and the cuts are so crisp. Not cheap, but oh so pretty.
Christmas isn't over, but from my selection, I think I've already begun longing for spring. (I didn't even realize it when I ordered these stones last week.)
What can I say. I can't resist a few more baubles. I've already got a few new designs in mind.
Do you want to subscribe to my blog by email? Click here!.
Would you like to be a Contrariwise follower? (I love having more friends!) All you have to do is click on the link in the upper right on my side bar.
Monday, December 15, 2008
I've been running my rock tumbler almost non-stop for the past several weeks because of the Christmas rush in jewelry orders. It's used as a final step to polish my silver jewelry. In the past year, I've probably probably been running it about 48+ hours a week.
I first noticed that it's a bit sticky where the plastic meets the O-ring. Then it started hiccuping.
I finally came to the conclusion that the O-ring is shot PLUS there's wear where parts meet.
The O-ring isn't anything you could easily find at Lowe's. I suppose I might be able to find it on the internet. But, since I only paid $3 for this tumbler, I thought it might be time to upgrade to a better model.
So, in honor of my tumbler's faithful service for the past year, I'm re-running one of my favorite posts from last year:
Adventures in Jewelry Making: The Rock Tumbler
A while back while I was out on a garage sale run , I found a toy rock tumbler -the kind that you can buy at Michaels Craft Stores - for only $3.00.
It didn't look too bad. According to the seller, the tumbler was never used, however the little rocks and grit were missing. But, all in all, not a bad deal. I thought my 10 year old would like to try it or maybe I could use it for something.
Well a couple years passed and the tumbler collected dust in the front closet.
I'd always heard that tumblers are great for silver jewelry. They supposedly shine silver up and harden it. Since I make a lot of silver jewelry, it sounded like it might be worth a shot!
Next step: find out what I need to know about tumbling silver jewelry.
Google, of course comes in handy. I found this site that tells you just about everything you need to know about tumbling silver: http://urbanmaille.com/articles.asp?id=148 Armed with the information, I am ready to begin.
First. I already have a tumbler. (So what if it's plastic! No snickering!) It looks simple enough and seems to work all right without anything in it..

Next, I need to get some steel shot - probably about a pound worth. After checking some sites, I realize that I will be paying more for my steel shot to FILL the tumbler, than I PAID for the tumbler itself. Plus there's a shipping fee for mailing a whole pound of stainless steel shot across state borders. This is getting expensive.
So, $24 later I have my steel shot:

I guess it must be dirty because the directions say that I'm supposed wash it before I use it with jewelry.
??? So what should you use to wash steel shot with???
Well, I have a colander. I checked the holes and decided that the shot PROBABLY wouldn't go through them. But...wait a minute... using a colander would mean I would have to put it and my steel shot in my sink and run water over them. Not a good idea. I don't want any steel shot going down my sink and into my garbage disposal!
What else? Let's see, I have some stainless steel mixing bowls. I can fill one up with soapy water, put the steel shot in it and swish it around. The shot could be washed on my counter top and not on the sink.
OK! Let's go!
So I got my bowl, put some warm water in it, and placed it around five feet away from my sink. I opened up my steel shot and started pouring it carefully in the water. Well, those steel shot are pretty heavy, and they seemed to gather some speed while I was pouring them in. All of a sudden -SWOOSH!
Do you know what happens when steel shot hit a steel mixing bowl. They start bouncing. About 5 of them bounce out of the bowl, and wouldn't you know those suckers bounced right across the counter top straight for my sink, with me scrambling after them and trying to catch them before they reached it.
I managed to catch two.
You KNOW where the others went.

Yes, they're down there.
No, I can't get them out.
Yes, I have to tell my husband something.
The plumber was called the next day. I was lucky. The house call only cost $120 because we didn't need a new garbage disposal. That would have been at least another $150 more.
In the end:
Rock Tumbler: $3
Steel Shot for said tumbler: $24
Plumbing bill for steel shot in disposal: $120
Look on my husband's face when the plumber handed him what was stuck in the disposal: priceless.
Thursday, December 11, 2008
Ack! I've been tagged: Seven random and contrariwise facts.
12 comments Posted by Contrariwise at 12:01 AM
I was recently tagged by Freida of Deer Mountain Creations. Her blog is Deer Mountain Wood Art.
Freida said she wanted to learn more about me, Contrariwise. Thanks Freida. But remember, these facts will probably bring up more questions than answers about me. :-)
First, these are the rules:
1. Link to your tagger and list these rules on your blog.
2. Share 7 facts about yourself on your blog, some random, some weird.
3. Tag 7 people at the end of your post by leaving their names as well as links to their blog.
4. Let them know they have been tagged by leaving a comment on their blog.
Seven weird and/or random facts about Contrariwise:
1. In one of my earlier jobs, I used to take dead bodies to a hospital morgue.
2. I learned to speak English by watching television. ("Ehhh....what's up, doc.") But you'd never know if you heard me speak.
3. I've traveled to 23 countries
4. I have a master's degree in Molecular Genetics
5. I am incapable of shutting a drawer or a cabinet door. (This random fact is supplied by my husband, who follows me in the kitchen, shutting doors and drawers, as well as commenting upon my inability, as he goes along.)
6. Bruce Springsteen once sweated on me.
7. I can probably date an antique bottle from North America within 20 yrs of when it was made.
So now I'll tag the following 7 people whose blogs I follow and I would like to know 7 more things about:
Carolyn Artist at Autumn Leaves Jewelry
Do you want to subscribe to my blog by email? Click here!.
Would you like to be a Contrariwise follower? (I love having more friends!) All you have to do is click on the link in the upper right on my side bar.
Wednesday, December 10, 2008
I am so seriously swamped with work, family, and with orders from Etsy, that I have barely any time to do anything. Not even post much on my blog.
So, instead, here's a picture of my dog:
Do you want to subscribe to my blog by email? Click here!.
Would you like to be a Contrariwise follower? (I love having more friends!) All you have to do is click on the link in the upper right on my side bar.
Monday, December 8, 2008
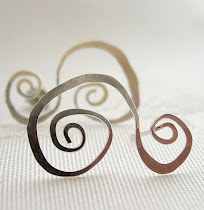
I've been trying my hand at making hoop earrings, lately. And these earrings suddenly emerged. (Yes, they really do that. New designs have a way of making themselves. It's almost like I have nothing to do with it.)

I don't know why, but they somehow remind me of the paintings of Mondrian. I know he mostly worked with squares and right angles. But if he had painted circles instead of squares, I could image this design element in his work.
I really like the way the spaces around the smaller circles and larger circles are balanced. And the way that small hoop on the bottom hangs down. I think I need to do a bracelet in this pattern - but with heavier silver.
Do you want to subscribe to my blog by email? Click here!.
Would you like to be a Contrariwise follower? (I love having more friends!) All you have to do is click on the link in the upper right on my side bar.
Saturday, December 6, 2008
That blissfully ignorant short space of time between the moment I open my delivery of 300 boxes for my customer's jewelry orders.... .... and then suddenly realize they're all the wrong size.
Do you want to subscribe to my blog by email? Click here!.
Would you like to be a Contrariwise follower? (I love having more friends!) All you have to do is click on the link in the upper right on my side bar.
Friday, December 5, 2008
Want more blog traffic? Try Image Search Optimization
44 comments Posted by Contrariwise at 12:01 AM Google Image Searches can bring as much or more traffic to your site as all other search engines combined. I did a little analysis of my blog for inbound searches recently and found that well over half of my inbound searches have come from Google Image Searches!
Three of the most important things that Google Image Search looks for, in descending order, are:
1. Alt Text
2. File Name
3. Surrounding Text
1. Alt Text
See the earrings above? In Blogger, in Compose mode all you see is the image. But if you click on the Edit Html tab, you will see the following html language:
Notice the alt="" that I highlighted in yellow?
The Alt Text (the part between the quotation marks) can contain keywords describing an image - BUT ONLY IF YOU ADD THEM. Alt Text is the text equivalent for an image, and is used by blind people (and also for other things).
But, importantly, Google uses Alt Text to find images. It's the MOST IMPORTANT element of Image Search Optimization.
How can you add it? Just by putting a description between the quotation marks.
I'll show you how. For this example, let's add the words "sterling silver hoop earrings swirls":
 Remember, try to be descriptive with your Alt Text, but don't over do it. The best thing to put here are keywords you personally would search for if you were looking for that image.
2. File Name
Instead of calling your photo file image1234.jpg, rename it to something more descriptive such as sterling-silver-earrings-with-swirls.jpg. Try to keep the File Name either the same, or very similar to the Alt Text. The name of the file for my earrings is silver-hoop-earrings-with-swirls.jpg. The html Image Name for the image is: Google will use the Image Name as it searches for images.
3. Surrounding Text
Always try and place a paragraph of descriptive text directly above and below your image, with words from your Alt Text and Image Name included in this text.
Google will look for relevance. If it doesn't think your Alt Text and Image Name correspond with your surrounding text, it might ignore your image.
It may take a while for google to crawl through the web and find your site, but you' ll be AMAZED at how many more hits your blog will have if you remember these 3 steps.
Do you want to subscribe to my blog by email? Click here!.
Would you like to be a Contrariwise follower? (I love having more friends!) All you have to do is click on the link in the upper right on my side bar.
Thursday, December 4, 2008
Recently, the Indianapolis Star ran a newspaper article about shopping online for Cyber Monday rather than going to the malls. And Etsy was prominently featured in the article and in the photo!
(Click on the photos to bring up a larger image.)
And guess whose shop was included in the photo!

Yes! It was mine!
I was absolutely shocked and ran around the house showing everyone. I had absolutely nothing to do with it. It was just luck that my shop was in the screenshot for the article!
Made my day.
Do you want to subscribe to my blog by email? Click here!.
Would you like to be a Contrariwise follower? (I love having more friends!) All you have to do is click on the link in the upper right on my side bar.
Wednesday, December 3, 2008
But before I tell you what I did, let me backtrack a bit.
Silver is expensive. I've been working with it for a while and have lots of little pieces that can't be used: tiny clippings, ends of wires too small for anything, and "mistakes" that have to be shelved.
All this time, I've carefully collected these bits of silver with the thought of recycling them -either by selling they back to a supplier or melting them down to be reused.
While I'm not into casting (YET!!!), it's easy enough to melt down small bits of silver into little spheres. I've done it before and have been thinking about incorporating them into my work.
These melted-down spheres are REALLY solid and REALLY heavy. I thought to myself, why not use them to weigh down my earrings so they stay EXACTLY the way they're supposed to.
 So that what I decided to do.
My 13 year old daughter, Emma, was more than happy to sit in the garage with a propane torch and melt down pieces of silver into balls. (She thought it was so much fun that she probably would have been willing to PAY ME for the opportunity! LOL) After they were made, I was more than happy to try to incorporate them into the earrings.
 And, after some trial and error, I was able to get the silver spheres soldered on the bottoms of the hoops, weighing them down.
After all this, I had to re-sand the earrings with increasingly finer grits of sandpaper, then tumble them with steel shot in a tumbler so that the earrings really shine.

Overall, I think they didn't turn out too badly - for a mistake.
Do you want to subscribe to my blog by email? Click here!.
Would you like to be a Contrariwise follower? (I love having more friends!) All you have to do is click on the link in the upper right on my side bar.
Tuesday, December 2, 2008
 I've recently learned to solder. While my early attempts were making bezel-set rings, lately I've been going to simpler things: hoops and circles.
Just making simple rings from wire, soldering them to make perfect circles (more or less), then hammering them to the desired shape can be so gratifying.
Especially the hammering.
I've had a number of designs in my head. Not content to go with simple circles, I wanted to make them a bit more...organic. So I was thinking about graceful curves, hammered to bring out a dimensional look.
Plus I wanted them to be substantial. So I decided to be daring and pulled out my 14 gauge sterling wire. It has a lot of heft. Yes, perfect.
I made one large and one smaller circle. Soldered them, formed them freehand and hammered them. Then hung them on handmade links.
You can see them above. Notice I left the tops of the hoops unhammered, but flattened the bottoms to create some dimension.
As with all new designs, I had to wear them - let's call it quality control. Sometimes new pieces have quirks that need to be modified before they can be considered ready to be sold. So I wore them -- to a roller skating rink.
While there, I found that they had an annoying little habit - they didn't want to stay in position! Instead, they tended to flip around to this:
Why did they do that?
I think it's because the flattened areas (which I wanted to hang down) tended to weigh slightly less than the unhammered tops. So when I moved around, gravity made them shift.
Sigh. What to do?
I thought about a number of fixes:
Solder the rings together and solder a jump ring to the top. (But I would lose the movement I wanted in these earrings.)
Tie them up on the top with wire. (I didn't think this would look good.)
Drill a hole at the tops of the hoops and put a jump ring through it. (Maybe. But the hole would have to be pretty small and so would the wire for the jump ring. OR I would have to hammer the tops, which would make them lose the dimensional effect I wanted.)
I spent a couple of weeks thinking about it until I came to a solution.
TO BE CONTINUED.
Tomorrow: the solution.
Do you want to subscribe to my blog by email? Click here!.
Would you like to be a Contrariwise follower? (I love having more friends!) All you have to do is click on the link in the upper right on my side bar.
Monday, December 1, 2008
Angels and Demons Trailer
It seems almost a family tradition that we go to the movies on the day after Thanksgiving. I guess we're all sitting with a food hangover, no one wants to brave the malls on Black Friday... so why not a movie!
Well while there, I got to see the Angels & Demons trailer. This movie is based on a book by Dan Brown, who also wrote the DaVinci Code. I've read both books (who HASN'T READ the DaVinci Code) and really preferred Angels and Demons, hands down.

The story takes place in Rome, much of it in the Vatican. In the opening scene of the trailer there're a breath-taking fly-by over St Peter's. It eventually pans to a statue of an angel on the basilica - FLASH OF LIGHTENING - which turns into a demon.
Very, very cool effect. Except they made a mistake. There are no angels on St Peter's. None. I've been there and the top of St Peter's has huge statues of popes and saints.
Still, I'm looking forward to the movie.
Coming up on Contrariwise Ramblings tomorrow: new jewelry design that didn't turn out. (Hey, we all make mistakes.)
Do you want to subscribe to my blog by email? Click here!.
Would you like to be a Contrariwise follower? (I love having more friends!) All you have to do is click on the link in the upper right on my side bar.
Saturday, November 29, 2008
Every Saturday, Timothy Adam Designs features a different shop on his blog and promotes it on his Twitter channel. Well this week, he's featuring my shop!
Go here to see his blog and the Saturday Super Shop Feature.
Many, many thanks, Timothy.
Of course, please stop by his Etsy shop, where he has modern unique jewelry, art, furniture clocks jewelry displays and much more.
Friday, November 28, 2008
Google Adsense vs Project Wonderful. A comparison after 1 week of advertising.
12 comments Posted by Contrariwise at 9:20 AM
The experiment
I had heard so much about both Google Adsense and Project Wonderful. Supposedly you can generate revenue from your blog. They sounded interesting so I decided to try them. (Everyone else seems to be using them!)
And while I was at it, why not make a little project of it and compare how they do.
It was easy to get Adsense on my blog. Blogger has widgets that allow you to put ads on your side bar. You do have to apply for an account and it took one day to be approved. The ads are related to the content of the blog. So you can see that the ads in my blog are about jewelry, jewelry findings, or silver. (Although an occasional bizarre one tends to creep in.) Adsense has a disadvantage in that the ads are in text only. The maximum number of ads I can have on my blog is 3.
It took about 4 days for me to be approved by Project Wonderful as a publisher. (They review the content of blogs and require a minimum number of posts. ) To be fair in this experiment, I decided to have the same number of ads as Google Adsense: 3.
Stats: Clicks per ad
Revenues from Adsense are based on number of clicks per ad, which differs from Project Wonderful where advertisers pay by the day, instead of by the click.
In the 1st week, there were 2 clicks on Google Adsense ads. (Not exactly on fire, are they?)
It's not as easly to figure out total number of clicks per ad for Project Wonderful. Ads can be on my blog for seconds or for days. Some ads have gotten as many as 12 clicks, some have gotten none.
Stats: Page Views
Per Project Wonderful, the displays per ad have ranged between 550 to 990 displays per day. My page views have averaged about 650 per day for the past 5 days.
Stats: Revenues
Bottom line. After 1 week
Adsense: 2 clicks and $0.16
Project Wonderful: $2.26
I haven't figured out how Google Adsense determines payment per click. How much you earn depends on a number of factors including how much an advertiser bids on your site -- you'll receive a portion of what the advertiser pays.
The Project Wonderful ad spots on my blog have floating prices, they can rise or fall depending to the willingness of advertisers to place bids. In the past week, it's pretty much ranged between $0.09 to $0.30 per day.
Bottom line.
Obviously, I must blog for the love of it. It's definitely not for the money.
Do you want to subscribe to my blog by email? Click here!.
Would you like to be a Contrariwise follower? (I love having more friends!) All you have to do is click on the link in the upper right on my side bar.
Thursday, November 27, 2008
Happy Thanksgiving to all!
Today, I thought I would feature a few of the many Thanksgiving-related creations on Etsy. Each image is linked to the corresponding Etsy shop. Just click on it to bring you there.


EatonWeb Blog Directory
Wednesday, November 26, 2008
Yesterday I wrote about some criticism that I received from a fellow jewelry maker about writing jewelry tutorials and giving away "trade secrets".
I want to thank everyone for the wonderful support I received from you. Wow. You guys rock!
Why do I write tutorials? I guess I like to share. Sometimes it's taken a long time to figure out how to do a certain technique and I've learned it through trial and error. I'm proud when I finally master it, and I want to share. Perhaps in doing so, people won't have to make the same mistakes I made.
AND it give me a great feeling when someone finds my work inspiring and my tutorials useful.
So I want to share with you an e-mail I got a couple of days ago. Jozie took the time to write this wonderful message to me, which made my day. THIS is the reason I write tutorials.
I got a follow-up message from her that she just listed her first pair of wire earrings. Please go check them out at her shop, Jewelry by Jozie.
Do you want to subscribe to my blog by email? Click here!.
Would you like to be a Contrariwise follower? (I love having more friends!) All you have to do is click on the link in the upper right on my side bar.
Tuesday, November 25, 2008
I don't know if you remember, but earlier this year, I posted a tutorial on how to wrap briolette beads.
I just recently got an interesting e-mail from a fellow jewelry maker. She said that wrapping briolettes was information that she worked hard to discover herself and that it was hard-earned; she was upset that I was sharing it. She called me out on her blog, too.
Well do you know what I say. Knowledge is worthless unless it is shared. It's not a commodity to hoard.
Furthermore, ANYONE can figure out how to wrap beads. Most bead magazines have instructions. Plus it's easy enough to find by googling.
So in as a response to her letter, I am re-posting my tutorial, below.
Good luck to all my fellow beaders and jewelry makers, and I hope your briolettes turn out BRILLIANTLY!
The Contrariwise Method to wrap briolettes and tear-shaped beads
Supplies:
Instructions:
1)Thread the wire through the bead's hole, making it poke out about an inch on one side.
2)Pinch both wires at the top of the briolette to form the shape of a triangle, making sure that the stone is centered
3) Take the short end and wrap it around the longer wire 2-3 times, like this:

4)Snip off the tiny bit of wire sticking out.
5)Using your round pliers, create a loop:

(You could actuall stop here, finish with a wrapped loop, and be done. But we'll continue with wrapping the wire down the gemstone.)
6)Now start wrapping the wire. You will wrap around the wire below the loop, then wrap around the bead. You can stop wrapping above the hole in the bead or below it, depending on the look you want. In this case I wrapped below the hole.

7) At this point you need to decide how to finish this off. There are a number of ways:
- Cut the wire flush and either tuck it under the last wrap or press it neatly against the stone.
- Wrap the wire back up the bead carefully, then secure it by tucking it into the bead hole or wrapping it a couple of times under the loop. (If you want a "messy" look, wrap the wire back up loosely.)
- To create a swirl in front of the bead, cut the wire, leaving about 1/2 inch. Then create the swirl and press it against the bead. Example:

- Wrap the wire back up once accross the front of the wrapping, then a couple of times below the loop. (My preferred method). Example:

And that's all there is to it! Happy wire wrapping!

Of you'd like to become a follower of my blog, just click on Contrariwise followers in the upper right of this blog and become one of my posse.
If you'd be interesting in subscribing to my blog and receiving it by e-mail, just click Subscribe to Contrariwise ramblings by Email.
Monday, November 24, 2008
 Did you ever click on an image in a blog to get a better look? I know I have. Sometimes nothing happens. But sometimes the click takes you to a larger version.
But did you know that you can link your image to a webpage? So that when you click on the image you get transported to who-knows-where?
For example. Click on the photo on the right. Where does it take you?
Yes, I've just shamelessly used the photo as a marketing tool.
How do you do this on blogger? It's easy.
Click on the icon that allows you to insert an image. That should bring up a familiar screen where you choose your image and layout. Place your image where you want it in your post.
Then, in the Compose tab, click on the photo once to select it. Then click on the link tool.
Insert the address and...Voila! Your image is linked!
As you saw, I linked the image directly to my Etsy shop. You can link the photo to a corresponding item in your shop (which I've done before and could directly attribute more views to it from my post). But if your item sells, then you have to remember to update your link.
Do you want to subscribe to my blog by email? Click here!.
Would you like to be a Contrariwise follower? (I love having more friends!) All you have to do is click on the link in the upper right on my side bar.
Saturday, November 22, 2008
And now, an inspirational message for all of us:
(I wonder what's really in those vitamins.)
Do you want to subscribe to my blog by email? Click here!.
Would you like to be a Contrariwise follower? (I love having more friends!) All you have to do is click on the link in the upper right on my side bar.
Friday, November 21, 2008
Friday downloads, Nov 22: Crafts,Tutorials, and More!
15 comments Posted by Contrariwise at 12:01 AMOnce again it's my weekly download. A collection of wonderful stuff I found on the web this past week.
How to make CD cases from paper
If you're like me, you have tons of CDs lying around, littering the desk and in drawers. The kids use them for school, we have CDs that we burn stuff on, and then the sprinkling of audio CDs. (Mom still buys those, although they're like dinosaurs, doomed to eventual extinction.) Most of them without any covers. I've bought cute little plastic covers, but I run out of them quickly. Plus they're p-l-a-s-t-i-c.
Well, here's a way of keeping our CDs unscratched, giving ourselves an opportunity to use our creativity, and staying GREEN, all at the same time!
You can EASILY make your own CD covers with paper!
How To Make A CD Cover Using A4 Paper - The top video clips of the week are here
I mean, how simple is this and why haven't I thought of it before!
You can add personal touches and your creativity to them. For example, design, print or xerox any arty label you want... glue them on - or use rubber stamps, silkscreen, linoluem cut print... whatever.
 You can also use different paper - scrapbooking papers, pieces of wallpaper, handouts you received in class (or work) that you would otherwise throw away.
Marlie's Creative Universe suggests using magazine ads. These create a really nice graphic look. Plus it's a really good re-use of something on hand, that would either be going to recycling or possibly -gasp!- the trash.
Additional info on how to make them is here.
Empty House makes his out of brown paper lunchbags. They're even easier to make than those from sheets of paper and I really like the almost industrial look. They have a lot of potential for personalization, too.
 If you want to print the contents of the CD on the cover, you can use this website to create a PDF file which can be printed on a regular piece of paper, then folded to create a paper CD case.
How to bind your own books
Binding books can seem intimidating
 because it usually requires specialized tools and costly supplies. But Craftynest has a tutorial that's an easy and inexpensive way to bind books—and it requires minimal specialized tools. Plus you can make these books any size you want and the supplies are recycled things from around the house, cereal boxes and scraps of paper.
I even found a site that had instructions on how to turn an e-book into a paperback-sized book! With a little creativity you can create books with glossy color covers that are hard to distinguish from a store-bought books.
There are lots of websites that have books in the public domain that can be downloaded for free! (For one, try Project Gutenberg .) Download one of these and bind with a special cover - what a fun gift that could be!
You don't just have to limit yourself to printing e-books. If you have a manuscript you have written, it is easy to set the page formatting in your word processor and print our your own book.
...And More!
 Fingerprint Wedding bands
Jeweler Andrew English has designed wedding bands which are hand-engraved with the fingerprint of the partner so that they're completely unique to each couple. They're only available by commission and come in 9, 14 and 18ct white/yellow/rose gold and platinum.
The bands are available in a number of styles with the fingerprint hand-engraved on either the inside or outside of the band. (Somehow I just find the idea of having your partner's fingerprint engraved on the inside of the wedding band terribly romantic and beautifully understated.)
Taking your obsession for cake making to the next higher level
All you see below are cakes that can be eaten without any part of it left. No plastics or any other artificial stuff is being used - everything is eatable. All this cakes by Zhanna from St. Petersburg.I just chose a few examples. For more incredible cakes, go here.


I have to admit, I’m a little disturbed by this last cake with beer, fish and newspapers in the decoration. I'm just hopin the frosting fish still doesn't tastes like what it looks like.
Do you want to subscribe to my blog by email? Click here!.
Would you like to be a Contrariwise follower? (I love having more friends!) All you have to do is click on the link in the upper right on my side bar.


