Wednesday, November 19, 2008
Etsy tips for a better shop: Periodically update your photos and listings
13 comments Posted by Contrariwise at 12:01 AMJust because you've listed an item on Etsy, doesn't mean the listing is carved in stone.
I'll often go through my listings and look for opportunities to improve them or update them.
Let me give you a couple of examples.
Updating descriptions and titles Your listing description shouldn't say that your beautiful handmade item has a lovely pastel palette perfect for Easter - in September!
If you have a seasonal description, you should update it seasonally. The above was a really blatant example, but season descriptions can creep in subtly. Minor changes to make your listing "fresh" can make a difference.
Last Christmas time, I listed the earrings on the left under the name of "Christmas Kisses", complete with a holiday-themed description. I ended up selling quite a few pairs . But I didn't want to stop listing my "Kisses" in my shop - they really can be worn any time of the year. So, after Christmas, I renamed them "Valentine Kisses" and wrote a season-appropriate description.
That worked very well and I did sell several pairs for that holiday.
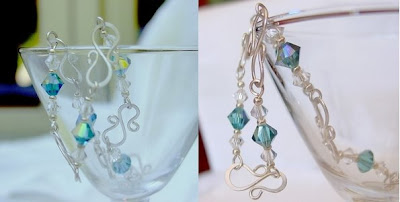
Take opportunities to improve your photos My Dangling Swirl Earrings were originally available in my shop a couple of months ago. Even though I had photographed them several times, I was never happy with the photos. On the right is my original listing photo for them. Yes, they've sold twice and I've relisted them, but I thought the photo needed major improvement.
I was recently playing around with my lightbox - changing the lighting and  experimenting with different backgrounds. I wanted a background that would complement sterling silver. I tried various colors of cardstock, pieces of wood, tiles, different types of stones, etc - then I tried a placemat with rich dark colors. (Placemat??!!) I really liked the deep color and the way silver seemed to pop against it. It also subtly evokes the holiday season.
I went back and took new photos of the Dangling Swirl Earrings and I am so happy I did. You can see the new photo on the left.
Now I feel the photos represent my earrings better - and I don't cringe every time I look at them.
Do you want to subscribe to my blog by email? Click here!.
Would you like to be a Contrariwise follower? (I love having more friends!) All you have to do is click on the link in the upper right on my side bar.
Wednesday, March 5, 2008
It took me a lot of trial and error to get my photos to an acceptable stage. (I say "acceptable", because there is always room for improvement.)
 Makes a huge difference, doesn't it. Not only is the background close to the original color, but now the gemstones really "pop".
2) Control the exposure time of your pictures. This is useful if your photos are extremely washed out (too much exposure) or dull/dark (too little exposure). The range on most cameras is -2 to 2 and is usually set to 0 by default. A setting of +1 is a good place to start.
Here is an example in a lightbox. The exposure for the left picture is +1, the middle is 0, and the right picture is at -1. Depending on the ambient lighting and the background, the optimal exposure will vary.

In this case, a setting between +1 and 0 would probably be best.
3) Use optimal lighting. Natural diffused daylight is best. 2nd best is a lightbox. (Never use your flash, at least on jewelry- it can create a one dimensional washed out look.)
Get a lightbox or make one. Then you won't have to rely on the sun all the time. It's easy to make one; here's a few links.

4) Use the macro setting on your camera if you are photographing small items or want to take detailed close-up shots. (The icon is a little flower.) This setting helps your camera focus on small details within your image. You will either need a really steady hand or you might consider using a tripod.
Here's an example of the kind of detail you can get with the macro setting. Guess which picture was taken using the macro lens setting!
 With out the macro setting, I would have to take the photo several feet farther from the item. I would lose detail, even if I cropped the photo severely.
5) Use a photo editing program. A photo can be saved with cropping and brightening. Some things I usually use to improve my photos are increasing contrast, gamma correction, increasing or decreasing the saturation, and sharpening.
Photoshop is a great program for editing. But some free (and simpler) programs include Picassa and Photofiltre.

This made a huge difference. The colors in the background and in the rose quartz stone are now true. The result is that this photo almost doesn't look bad!
Here's a few great examples that I found on Etsy. (You might be able to recognize a couple of sellers from their photograpy.
 If If you find something that works, stick with it. A lot of successful sellers have unique styles that make them instantly recognizable. (I haven't acheived this yet, but I'm still working on it.)
7) Look on Etsy for ideas! There's a lot of great inspiration out there.
If you'd be interesting in subscribing to my blog and receiving it by e-mail, just click Subscribe to Contrariwise ramblings by Email
Thursday, February 21, 2008
Blogger only gives you 3 choices for the size of the photos you post. Sometimes I've found that I wanted to post a larger or a smaller picture. It took me a while to figure out how to do this but after some googling, I finally figured it out.
1) First, your pictures have to be on an outside hosting site, not on your computer. For this example, I am using flickr .
2) Go to the picture you want in flickr. On the lower right, click on the option "See different sizes"
The size options include square, thumbnail, small medium, and original.
3) Click on the size you want. To link that size photo on your blog, you need to copy the html code found at the bottom of the flickr page.
4) Copy the html code that those sites give you and paste it where you want it to appear in your blog post. VERY IMPORTANT: You must use the Edit Html tab not the Compose tab.
Voila!
Here are examples of photos I linked to from my flickr account.
75x75 square:

Thumbnail size (100 x 97):

Small size (240x233):
Medium size (500x486):
Original size (700x68)
(If you don't like the standard sizes given by flickr, you can resize the photo to whatever you want first, by either using the editing program within Flickr, or resizing it in your photoediting program before uploading it to flickr.)
You can easily center the pictures by clicking on the photo (in the Compose view) and clicking on the Justify Center option.
Friday, January 18, 2008
When I create a new jewelry design, I'll often only make one piece. I might wear it to see if there are any problems with it. (Will the clasp hold? does the necklace hang properly? ) Before making multiples of the same item I might show it around to gauge interest or list it on Etsy to see if it sells .
 When I'm finished I photocopy the jewelry. Unlike a photograph, a photocopy will give you a better idea of dimensions since it's at the same scale as the jewelry.

Tuesday, January 15, 2008
Having grown up just a few miles from the ocean (Long Island Sound, actually, but that's close enough), I have many fond memories of playing on the beach, making sandcastles, chasing and catching minnows, and drawing in the sand.

One day as I was browsing through the many shops on Etsy, I came across a shop called CaptureCapeMay, that offered photos of personal messages written in the sand in Cape May. Wow, I remember doing that! Here's someone who took something so commonplace, looked at it with a fresh eye, and created a great new concept. This is just genius!
 They write custom messages in the sand on one of Cape May’s many famous beaches and capture them with a Cannon Digital Rebel XT. The photos are printed on crystal archive paper and can be made in various sizes.
  And wouldn't they be perfect for Valentine's Day! ( "Beth [heart] Dan", "Lucy and Charlie" )
Tuesday, January 8, 2008
If you sell things on the internet, you know that good photos are essential. To improve your digital photos there are programs that you can buy like Photoshop (which I have but really don't know how to use) and programs that you can download for free. For example, I use Photofiltre which is relatively easy to use. (Read: 'idiot proof'". ) But even with these programs, pretty much all I can do is lighten up an image that's too dark, crop it, or make it sharper.
While manipulating photos has become relatively easy, to do it well is not easy and not that many people have that talent. Therefore, I am pretty much in awe of people who are great at it.
If you want to see some really great photoshop work, go to Worth1000 . People display their photoshopping skills in contests with different themes. Examples of contests are on Woorth1000:
Supersize it! <---Really huge food portions You Are What You Eat 3 <---turning people into food Surreal stories <---Putting a Salvador Dali slant on the world Here's one more great link on photoshopped animals .
The people who participate in these contests are really good. I mean really good. Either they're professionals or they have an awful lot of free time on their hands. I mean, most of us can barely take a reasonable photo let alone touch it up.
There are a number of people on the internet that can create photo montages for you. One person that creates custom collage portraits is 6timemomma. (That name comes from the fact that she has SIX KIDS all under the age of 11!) She can take an already cute picture of your child
And create it into a fantasy image a la Anne Geddes:

<--I guess this is where babies come from.
 And what little girl wouldn't love to have a photo of her as a fairy!?
I can just see this hanging my my daughter's room and her getting ooohs and ahhhs from all her friends.

Here's another one of her works; I love the composition with the mushrooms.
6timemomma also does serious photography. She's exhibited her photos, they've been published, and one of them was even selected as a Betterphoto First Place winner out of more than 23,000 images!
You can find 6timemomma's online shop at http://www.6timemomma.etsy.com/


