Sunday, May 18, 2008
 After I posted about my upcoming trip to Barcelona, I got a message from Daisy Chain Jewelry. Coincedentally, she'd just posted a list of Barcelona bead shops in her blog. She's from the UK and has been to Barcelona a number of times. (UK to Barcelona is just a hop, skip and a jump, compared to traveling from the Midwest.)
So with the info in her blog, a little googling, and Google Maps (gotta love them!), I mapped out some potential shopping sites during my visit!
The shops cluster in an area of town called the Gothic Quarter (Barr Gotic). Based on the map, I'd say this is less than 1 1/2 miles from my hotel.
Even with the bead shops being an incentive, I'm sure it's a place that I'll be visiting anyway. I understand that the Barri Gotic area is the area of the old town of Barcelona and it has lots of narrow cobbled streets with tall old buildings.
From what I've read about it, it seems like it's pretty typical with other "old towns" in major European cities - small squares surrounded with labyrinthine streets. From my experience, these kinds of areas are usually great places to wander around. (Most of the Barri Gotic is closed to regular traffic although open to service vehicles and taxis. )
I'm looking forward to getting lost in the many small streets and squares - hopefully filled with picturesque buildings, old shops, and newer boutiques.
(Museums, cathedrals and shopping - oh my!)
I'm looking forward to seeing a Barcelona as beautiful as pictures that I've seen. Here's one I found on flickr: A view of Barcelona from the terrace of the Park Güell, by the architect Antoni Gaudí, taken at dusk.
I've got my camera and laptop! Hopefully I'll have access to the internet and will be able to post some of my experiences while I'm there!
(If you'd be interesting in subscribing to my blog and receiving it by e-mail, just click Subscribe to Contrariwise ramblings by Email.)
Friday, May 16, 2008
Earwires
Last week, I posted tutorials on how to make headpins. So I thought to myself, why not post some how-to's on earwires.
You can always buy your own, but to be honest, most of the time they're pretty expensive considering the amount of materials in them. But they can also be pretty generic. I tend to make my own because 1) I'm cheap 2) They're so easy to make 3) When they coordinate your earring design, they can be pretty darn impressive.
Of the earrings I make, hardly 2 of them ever use the exact same earwire! Here are some examples from my Etsy shop.
 As you can see, either the style is a bit different, or the diameter or length of the loop varies. I've used sharpies, pencils, markers, even a prescription pill bottle to make the loops. I might also hammer the earwires depending on whether I feel that style fits in the overall design (see the 3rd and 4th earrings from the left).
So I went out on the web and tried to find some really good tutorials. Well, there are a lot of them. But, to be honest with you, I didn't see very many that I liked. Either they used equipment that wasn't standard (i.e. rolling presses. I mean, who has rolling presses!) or I didn't like the final result.
In lieu of me doing my own tutorial, I put together some that I found and provide you with my opinions.
 This one is quite good and it comes from Hazel & Honeysuckle. Nice basic handmade earwire using a tool everyone has: a sharpie.
Personally, I have a wire rounder and I find it pretty inefficient. Do you know what I like to use? A metal nail file that I bought at Meier's for 99 cents. It works, it's cheap, and if you lose it, so what. Buy another.
 Wig Jig has a tutorial - but you have to buy their jig and a "super peg" . (Surprise, surprise.) The earwires (see left) actually look pretty nice but they look pretty similar to the ones you can make with a sharpie - without the little "flip" at the end. The best thing about using a jig is that your earwires will have a consistant size and shape.
 The good thing about making your own earwires is that you can add special touches to them, like incorporating a bead. Glitter Critter has a free tutorial in her shop on how to do that. Plus her tutorial also has instructions on how to make your own handmade earring jig. It really helps you make identical earrings yet still gives your creations that special hand crafted look.
 .jpg)
 If you want to make an earwire similar to the earrings to the left, Orion Designs has a very nice tuturial posted in her blog.
  On the left is a picture of one of my earrings with French kidney wires. This type of earwire is a little harder to make - you have to be careful to measure each bend accurately and there's not jig involved -but I think they're a lot of fun. Plus you never have to worry about the earring falling out of your ear.
Here's a downloadable pdf on how to make the basic French kidney earwire.
 On the right is a variation of the kidney wire. I've incorporated pearls right onto the wire as part of the overall design. (I told you kidney wires could be fun!)
 And what about the earwires that have little balls at the end of them like the ones on the left? Don’t buy them! Just take the headpins that you made from last week’s tutorials, and follow the basic earwire instructions above.
Voila!
For centuries the peanut was revered for its peaceful nutritional properties and much loved by elephants. Looking back over the historical record, the only blemish on the peanut came when peanut rancher Jimmy Carter was elected president of the United States. Had Carter raised okra instead of getting rich off of peanuts, he never would have become president, and we wouldn't be in Iraq today. (It's a long story. We'll save it for another post.)
How peanuts suddenly became Public Enemy Legume No. 1 is unclear. Years ago, the millions of children who were raised on peanut butter and jelly sandwiches apparently simply "dodged the legume" forced upon them by uncaring parents.
Maybe kids suffering from "peanut envy" when they see other children enjoying a PB&J sandwich eventually will overcome their allergic reactions to the lowly legume. Or maybe a more people-friendly peanut can be invented. In the meantime, here's something that you can download and post in your school, office, or anywhere where you need to creat a nut-free zone.

via
(The above poster makes me want to run out and get myself a peanut butter sandwich. Hmmm....Skippy....yum!)
What "type" are you???
What's your type? What type do you click best with, and which types spell doom? In five quick questions, you'll find out about your identity. Plus, you'll have a chance to typecast that special someone, and see if you have a future.

Here's a bit of trivia for you Etsy folks out there. Did you know that the majority of shops use Papyrus font for their shop banner? I didn't believe it, so I started looking. Then I suddenly realized, even my shop banner is in Papyrus!
(Note to self: change shop banner.)
(If you'd be interesting in subscribing to my blog and receiving it by e-mail, just click Subscribe to Contrariwise ramblings by Email.)
Thursday, May 15, 2008
 When I was little, my father used to tell me stories about the many places he traveled to when he fought in World War II.
Orginally part of the Polish army, he was imprisoned in a concentration camp in Siberia, was released and fought in a tank for the British forces in Africa against Rommel. He also fought in Italy and in France and who knows where else.
He saw the pyramids, the deserts, religious sites in the middle east (now Israel), famous places in Europe.


If you want to see the rest of the places I've been to, or more details, here's a link to my google map.
(If you'd be interesting in subscribing to my blog and receiving it by e-mail, just click Subscribe to Contrariwise ramblings by Email.)
Wednesday, May 14, 2008
Probably not.
It's only a sweatshop if you coerce minors into working long hours. When they coerce you into letting them melt silver into tiny little balls with a propane torch, it's called being too easy. This is how I spent my Mother's day. Playing in my workshop, making new jewelry, and having my youngest daughter help me. No laundry. Minor dinner prep. No cleaning. I was infinitely happy.
Here's my 12 yr-old, Emma, on the right, melting scraps of silver into liquid puddles of sterling. (Ever since Jerry showed her how to do this, she's been wanting to do this again.)
The silver is flamed on a charred piece of wood - I think the carbon helps it heat up faster and hotter, then melt all the faster. (But I'm not sure about this.) The silver starts to melt around the edges, then fuses, then turns into a red hot spinning ball! After you remove the flame and it cools a bit, it gets dunked into water to cool. No wonder Emma enjoys doing this!
We made a couple dozen silver balls of various sizes. Afterwards, I chose the largest ones and Emma chose the tiniest to make earrings. (She just got her ears pierced a couple of months ago.)
I soldered on some silver posts. (Yes,I finally got some soldering equipment which I'll write about in a future post. )
Those tiny earrings were such a pain to make. The balls kept rolling around every time I tried to put a bit of solder on them and every time I tried to hold the post next to them. It took me quite a few attempts. (They say practice makes perfect, but I think it's just makes for exasperation.)
But I finally got them done. You can see the larger ones (about 6 mm) and the smaller ones in the photo above. The larger balls have a slightly pebbly surface which really reflects the light wonderfully. These post earrings are great for everyday wear and I think the tiny ones would be great for those extra ear piercings. I'm planning on making some more of these post earrings, and listing them in my Etsy shop.
And don't the tiny ones look cute on Emma!
(If you'd be interesting in subscribing to my blog and receiving it by e-mail, just click Subscribe to Contrariwise ramblings by Email.)
Friday, May 9, 2008
Crafts, Tutorials...
Making headpins. I love the kind of headpins that have little round balls on them. Ther'e made by melting the end of your wire with a torch until the end forms a small ball. It's a little problematic when you don't own a torch. I tried sticking the end of my wire onto my stove burner, unfortunately it's electric so that didn't work too well. I did successfully make them using my outdoor gas grill, but it's best that my husband doesn't hear about that again. So I broke down and bought a propane torch.
 But I digress. Silver River Jewelry has a great tutorial on how to make these lovely round-ended headpins. By either hand polishing or tumbling, you can make them nice and shiny, like you see above. But you also have the option of oxidizing them, which gives them a really different look. Depending on the design of the jewelry, they can appear either rustic or modern.
To make paddle headpins, all you need are a hammer and an anvil. The idea is to pound the end of your wire until the end is flat and paddle-shaped, which then becomes the end of your headpin.
These are pretty versatile; my turquoise wishbone earrings, on the right, use a variation of the paddle headpin as the earwire itself.
 There's also this nifty article which doen't require anything except round nose pliers and a wire cutter: Quick Homemade Headpins. I tried this out...it works but I didn't like the look. So, instead of cutting off part of the loop, I then bent the end around again and made it look like a tiny flat spiral.
Creative Jewelry storage I found a site that has some great ideas for jewelry storage . I especiallylike the look of the little bowls to keep your earrings and necklaces from becoming all tangles up. If you already have odd saucers and cups, this is a cost-free option.
 I've seen these types of shadow boxes for sale on Etsy. But you could make your own to either hang on your wall or set on your cabinet. You can use small decorative bowls perched on the box's lower ledge to hold rings, pins, brooches, and other little things. Hey, the whole thing doubles as a work of art!
The above link gives instructions on how to make one for yourself.
Joyful Abode solved her jewerly storage in the way that I solved it. By making a jewelry board. Mine is a plain corkboard (I didn't over it with fabric like Joyful Abode). And instead of ribbon, I used a narrow line of linen cloth, the kind used for cross-stitching. What's good about it is that you can poke your earwires in the cross-stitch holes. You can even poke post earrings through it!
My jewelry board hangs on the inside of our linen closet, in our bathroom.
...and more!
Taking Folk Art to a Different Level

Above, my friends, are fine examples of redneck art. Behold the Assquatch, or the delicate art of shaping a deer’s butt into a face of the monster.
 Mastery of the art is attained, apparently, when you can shape the anus into lips. The artist who created the masterpiece on the right, has obviously taken butt-hole manipulation to a whole new level.
 Many deer butt snobs will put their art outside, bragging on their good taste. For example, on the left, you can see the popular deer butt doorbells. Can you imagine the look on the faces of your company when they're greated by that tremendous piece of...uh, art.
But if you don't have any deer butt's handy, don't despair. Many creative folks will go on a scavenger hunt, searching for fresh road
 kill to use for their red neck art. Here is where the creative process is critical and you can let-loose with your artistic freedom to come up with a wealth of affordable fine art for your home. Even rodents can be sculptured into fine redneck art plaques. An example: the lovely squirrel butt coat hook.
But you don't have to limit yourself to hunting trophies or roadkill when you have a potential source of inspiration in your own home. Is your kitty getting a
 little old? Has he been missing the litter box lately? Coughing up a few too many hairballs? Well, maybe its time to convert him into a kitty cat butt refrigerator decoration! What better way to remember him forever!
You’ll find instructions for making your own folk art here, including illustrated instructions for proper anus tying.
And remember, no matter how you slice them, creating animal butt art is a fun and educational experience for the whole family.
Cute Overload
I can't help it. Baby kittens just make me melt. LISTEN to the little purr engine on this one.
Sigh. That kitty is OBSCENELY adorable. Like, it should be against the law, to be that cute. So precious, I think my brain melted out my ears.
(If you'd be interesting in subscribing to my blog and receiving it by e-mail, just click Subscribe to Contrariwise ramblings by Email.)
Thursday, May 8, 2008
Adventures in Jewelry Making: The Lost Earring (Part 3)
8 comments Posted by Contrariwise at 10:12 AM(If you haven't been following the story you'll need to read Part 1 and Part 2 first.)
I couldn’t wait till Saturday!
Emma, my 12 year old, was determined to go with me. (Sigh.) So we set off for Jerry’s house.
We knocked on the door and Jerry opened it. I could see that my friend was inside already.
Jerry took one look at both me and Emma standing there and said, “I see you brought reinforcements. You must be worried that I might be a dirty old man!”
He took us to the dining room where he had place a slab of drywall on his table as a workstation (!) and started pulling out tools and silver. And boxes of polished stones for Emma to play with.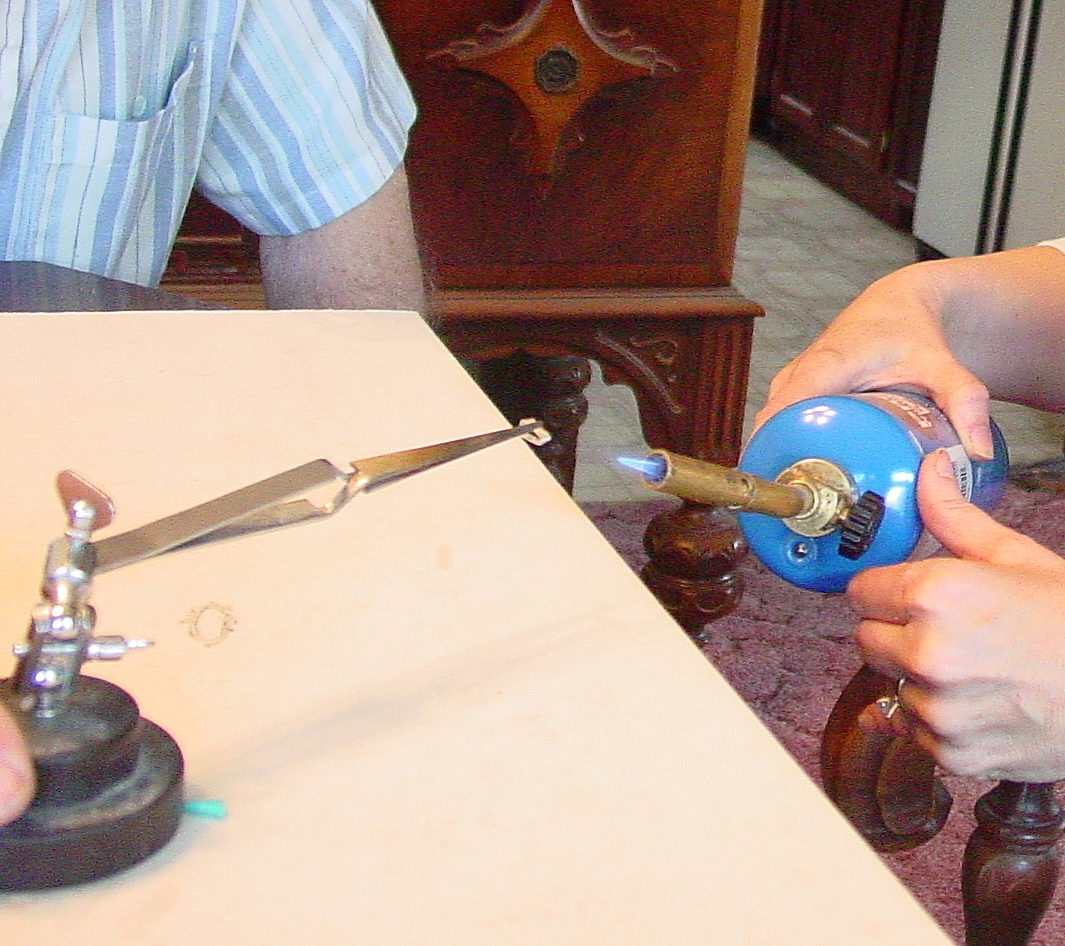 The first step was making the bezel. Using the fine silver, I got it into the right shape, soldered it, and then hammered the join to smooth it and stretch out the bezel to fit correctly.
Then Jerry pulled out different gauges of silver sheet. We decided that 26 gauge silver would be similar to the earring, and he handed me a pair of scissors ($1.00 at Harbour Freight !) to cut the sheet to a matching shape. It was a little difficult to estimate because the model earring has rounded edges and I had to do some guesswork.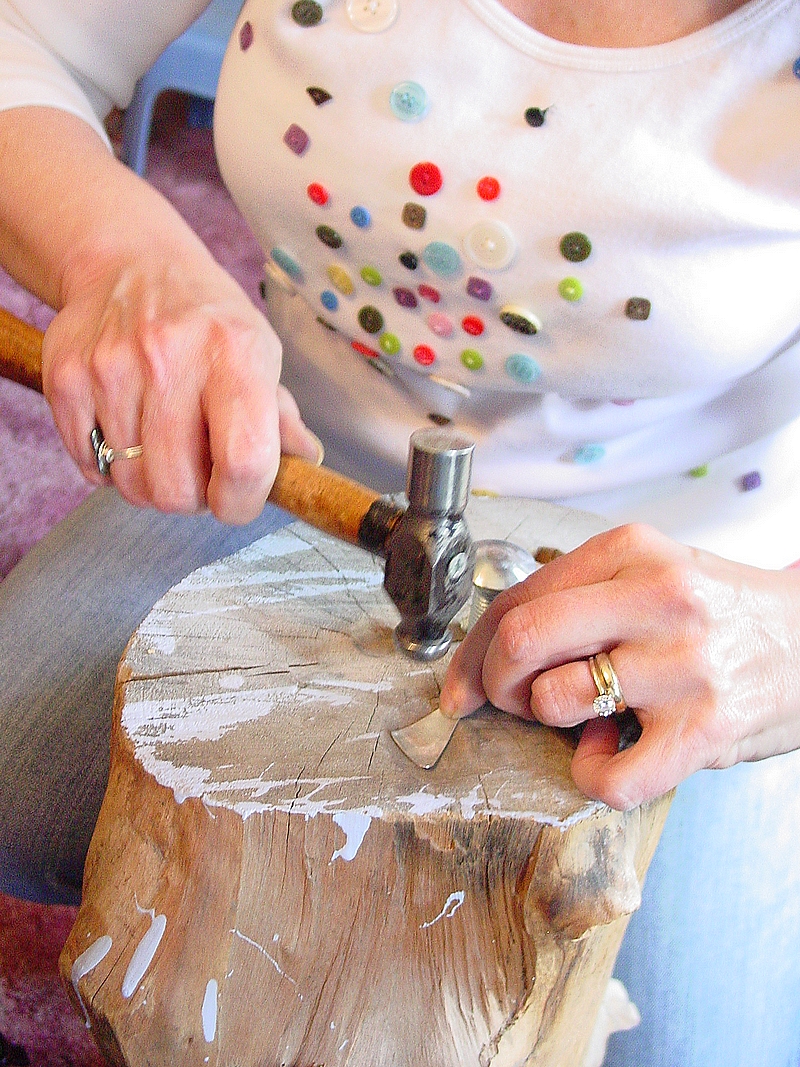 Next I knew I would need to get the texture right and get the edges curved, so I asked if we were going to use a dapping block. No. Too elaborate I guess. Jerry goes to the corner of the dining room and pulls out a tree trunk with holes and circles drilled in it. He also had some bolts that he uses as punches!
It took me quite a while to get the silver shaped right. I was surprised that he suggested I use the round end of the ballpeen hammer. But it worked great and got the surface to look like the earring’s.
While I was doing this, Jerry was entertaining Emma by showing her how to use a propane torch to melt scraps of silver into little balls on a piece of blackened wood. She loved it. She took to it like – well, like her mother!
I finished the curved base. I’ve learned that the edges would have to match perfectly for the solder to hold, so one side of the bezel had to be filed to match the curve perfectly.
Soldering the bezel to the base wasn’t too bad. (Look! From the photo on the left you can see it's already starting to look like it's mate!) What was really a pain, was soldering on the earring post. I tried to melt the solder, then stick the post on, but it didn’t want to stay. And in the middle of it, I knocked the earring off the soldering stand and it fell on the floor!
That’s when I found out Jerry’s carpet was a synthetic. Even though I quickly grabbed the piece with tweezers (yes, I had the wherewithal to NOT pick it up with my fingers), the hot metal melted the carpet and I had dribbles of melted fibers firmly welded onto the silver!
Yes, I was embarrassed, but it didn’t seem to faze Jerry in the least. I guess any man who has a tree trunk in his dining room and solders on his dining room table, isn’t going to be concerned about keeping his carpeting spotless – or even intact! As you can see, it took both of us, a Third Hand, and a jar of marbles to finally get the post soldered in. Then I pickled the earring, cleaned it up, and put it in a tumbler for a final shine. (The melted carpet was still on the underside.) While it was tumbling, we had the treat of checking out his basement workshop.
It was exactly what you’d expect the basement of an old house to look like: a mess with boxes and boxes of rocks and junk. Which meant it was GREAT. We got to rummage through his rock boxes and he showed us molds that he was working on. Emma spent most of the time under his tables looking for scraps of silver and pewter so she could melt them in little balls with his torch.
Finally the tumbling time was up and it was time to set the stone. It fit! I finished it up with a bezel roller and burninsher, then oxidized it to match the other earring. Now my friend now had two earrings that matched.
We thanked Jerry and asked him how much we owed him for all of this. He said,” Oh, let’s see… three hours of instruction…silver…turquoise…how about...$20?” He saw that we were speechless and said, “What? Too much?”
Can you believe it!
He also asked if I needed any soldering equipment and sold me a soldering stand with a screen (home made) for $5. Then he gave me a hemostat and a magnesim block. Emma walked away with a polished piece of fossilized dinosaur doo and a big chunk of pewter that she had melted down from scraps she’d found.
What a great day!
I spent a lot of time that weekend ordering soldering equipment and supplies - I can't wait till it comes. And my friend was so happy that she now has her favorite set of earrings to wear again.
These is what we ended up with (before the final oxidation step). The original is the one on the right:
(If you'd be interesting in subscribing to my blog and receiving it by e-mail, just click Subscribe to Contrariwise ramblings by Email.)
Wednesday, May 7, 2008
Adventures in Jewelry Making: The Lost Earring (Part 2)
5 comments Posted by Contrariwise at 6:02 AM(Continuation of yesterday's post.)
The next day I called the instructor to arrange for us to come over to make the earring. (For the sake of this story, let's call the instructor, Jerry, since that happens to be his real name anyway.) That's when I learned this was going to be a 2 step process: pick out a piece of turquoise first, then come back and do the metalwork.
So I drove over to his place with the lone earring to pick out the turquoise. I thoroughly expected that Jerry had pieces of turquoise already cut, and all I would have to do was pick one out that would match.
Wrong.
He brought out boxes and boxes of little chunks of turquoise that he'd saved from other projects throughout the years. I rummaged through them until I found one that I thought might be the right color and about the right size for cutting to match the stone in the earring. He agreed that it was an OK choice, and then set off to his basement where his lapidary equipment is.
What a treat! He had tons of equipment that I'd read about but never seen. Saws! Kilns! Casting tools! And boxes of uncut stones! I could probably spend days down there exploring!
He cut the raw chunk of turquoise on a special saw and handed me the piece you see on the left. At this stage, it was still about 4 times bigger than the stone in the earring.
I was expecting that the next step was that he would shape it and polish it to match.
Wrong, again.
Jerry brought out a couple pieces of sandpaper of different grits and and told me I would need to sand the chunk of turquoise down to the right shape. I rubbed the stone against the sandpaper - and realized it didn't make much of an effect on the stone.
Then he got out a bottle of tin oxide and a piece of leather and said that after sanding the stone down to the right size and shape, I would use this polish it.
Now you're probably thinking the same thing that I was - this would take forever!
I told him that I would work on it and get back to him when the turquoise was ready. I took all this stuff home that night and looked at the turquoise, the sandpaper, leather, and tin oxide.
 And that's when I took out my dremel.
Sandpaper? BAH! With the dremel and a grinding bit, it didn't take long to form that stone to the right size and shape. In fact, most of my time was spent hunting for the turquoise on the floor - it kept popping out of my hands and flying across the room when I was grinding it.
(Note to self: GET A VISE.) When I got the turquoise ground to the approximate size I wanted (see photo on the left), I used the sandpaper to smooth out the rough edges. The tin oxide was next. It really made the stone shiny with very little effort. In fact, it was pretty impressive!
Overall, it only took me 20 minutes to make the cabachon. Not bad.
The next day, I called Jerry and we made arrangements to meet to do the metalwork to create the matching earring.
TO BE CONTINUED...
(If you'd be interesting in subscribing to my blog and receiving it by e-mail, just click Subscribe to Contrariwise ramblings by Email.)
Tuesday, May 6, 2008
Adventures in Jewelry Making: The Lost Earring (Part 1)
8 comments Posted by Contrariwise at 6:19 AMA good friend of mine told me about a jewelry designer she knew in Minnesota. She' d purchased quite a few pieces for herself and for gifts, but he'd retired a while back and she never found anyone whose work she liked as much.
 When she showed it to me, I realized it couldn't be that difficult to duplicate - for someone who had access to turquoise, silver sheet, saws, and knew how to hammer and solder!
 He's about 75, retired, and a real character. It would be really entertaining but I couldn't help being a little wary - you know how it is.
I went back and told my friend about it and made the following arrangement: she would pay for the costs for the materials and whatever the instructor would charge. I wouldn't charge her anything, BUT she would have to come with me.
She agreed! And I planned to call him the next day to arrange the date and time.
TO BE CONTINUED....
(If you'd be interesting in subscribing to my blog and receiving it by e-mail, just click Subscribe to Contrariwise ramblings by Email.)
Friday, May 2, 2008
Crafts, Tutorials...
 Sliding knots are adjustable knots used to make all sorts of adjustable-length jewelry. No clasps, crimps, or jump loops are necessary. I have some pendants that would look great with a leather cord but hadn't figured out the best way of finishing it. This would be perfect.
Gypsy-woman has a tutorial with great photos. (She cleverly used 2 diffent colored cords to make the steps-by-step instructions much easier.)
Phoenix Sterling also has a downloadable pdf, with 2 variations of adjustable sliding knots.
I must be knotically challenged, because I still had a hard time figuring out how to replicate the technique until I found a You Tube video. So, if you're like me, this might help:
Pin Cushion Tutorials
There must be a lot of sewers out there because there are a ton of tutorials on how to make pincusions . All of these use repurposed materials and stuff you probably have hanging around your house.
 Tin Can Pincushion
 Your cat will be very happy if you make LOTS of these pincushions because they're made using the cans from wet cat food. (Remember, empty the food first. Also, you will find that washing the tin cans is not optional.) I'm sure you could also use tuna fish tin cans or even caps form spray paint.
 Teeny Tiny Pincushions
I found these adorable tiny pincushions made from bottlecaps at How About Orange. The colors as so pretty, they look almost good enough to eat! (Probably a bit prickly going down, though.)
Canadian crafter has a variation on these. She adds an elastic so that you can wear your pincushion as you sew.
Flights of Pincushion Fancy
 The queen of Pincushions has got to be Schmaltzy Craftsy. Her pincusions are like little artworks.
  Several of her amazing pincushions were featured as projects in the book Pretty little Pincushions which can be found at Barnes & Noble.
 ...and more!

 Understanding the ups and downs of Presidential politics can be difficult in this confusing time, when super-delegates and inexplicable Florida re-votes are all the rage. Thankfully, Fold US Candidate has created easy-to-use finger puppet versions of Obama, Clinton and McCain.
Simply select your candidate, download. Cut and fold. Glue and stick on your finger! Hold your own presidential debates with family & friends - in the kitchen, the bathroom, the classroom! Email Adi, the creator, your photos and videos of your debates, she'll post them on her Flickr site. Brilliant!
The only problem I had with the downloads, was that Hillary didn't want to fold.
Cute Overload.
...so...much...cute...head...asplode...
Not enough for you? How about this weiner dog race? So cute it'll make your teeth hurt.


.jpg)
.jpg)