Wednesday, October 8, 2008
Lots of people ask how to oxidize or antique sterling silver. Many people use Liver of Sulfur or SilverBalck. One method that is "green" is using eggs. The sulfer in the egg yolks creates a chemical reaction with the silver and causes it to darken.
There are a lot of variations of this method. Here's mine:
1. Boil some eggs. The more jewelry, the more eggs you need.

2.Put hot unpeeled eggs in a heavy duty ziploc bag and zip shut. (The eggs have to be hot for this to work.)
3. Squish the eggs really well. The yolk of the egg is where all the sulfury goodness is, so you'll want the yolk well squished. (It's also really cathartic.)
This can be really messy and disgusting. So you should try to do this without children around because they'll want to have all the fun.

4. Place your jewelry in the bag with the egg.

If you don't want the mess, you can put a paper towel on top of the egg and lay the jewelry on top of the paper towel. Then leave your jewelry in the bag overnight.
I find that if I put the jewelry directly in the eggs, it's a lot quicker. The jewelry will be oxidized within about an hour.
Here you see that the jewelry is getting darker:

Unlike the other methods, you can achieve a golden brown color using eggs. I prefer it darker, so I'm leaving the jewelry in the egg for longer. Maybe another 20 minutes or so. Maybe longer.
If you want your silver darker and the egg has cooled, you can reheat the egg in a microwave for a few seconds. But becareful not to leave it in too long - the silver will heat up and melt the baggie!
After reheating, wait some more.
5. Do some handstands while you're waiting.

6 When your jewelry has oxidized as dark as you want it, remove it from the bag.

(At this point, it's probably a good idea to clean it before sending the jewelry to your buyer or photographing it for sale. )
7. Scrub the jewelry well with a little soap.
You can either leave it as is, or you can rub it with steel wool to highlight the textures.
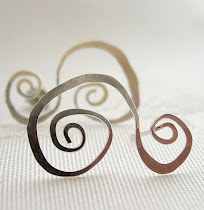
Here's the same ring, before and after oxidizing:

Some variations on this method:
- Use a tupperware container or a glass jar instead of a ziplock.
- Hang a string or wire across the top of the tupperware so you can suspend your jewelry and not get egg all over it. Or make a little stand for your jewelry to sit on.
- Peel a warm egg and place it whole with your jewelry in a airtight container. Leave overnight or longer. (Supposedly works better with old eggs.)
(If you'd be interesting in subscribing to my blog and receiving it by e-mail, just click here.)


-10oneworld on etsy
And so do I.
Love the photos of your daughter!
I had to LOL when I saw your scrub brush; is it a potato with eyeballs and feet? It looks exactly like mine, which IS a potato with eyeballs and feet!
I think that's the nicest thing anyone ever has said about my blog! Thanks for making me smile.
lol. Yes. It's our "potato brush". It was so funny that we HAD to get it. (Although its been used so much that the eyeballs are now gone.)
who'd have thought eggs could do that!
love the fun photo's :)