Tuesday, January 5, 2010

After getting everything set up, I spent a lot of time during the holidays working on new designs. In fact, I had so much fun doing that, that I didn't even want to "waste" any time photographing my new jewelry or listing it in my shop.

Do you want to subscribe to my blog by email? Click here!.
Would you like to be a Contrariwise (or MooShu) follower? All you have to do is click on the link in the upper right on my side bar.
Monday, January 4, 2010
My daughter left her sweatshirt on the ground and MooShu found that it was the perfect place to take a nap! Nice and warm, and close to the kitchen where yummy things are often found to fall to the floor.
Do you want to subscribe to my blog by email? Click here!.
Would you like to be a Contrariwise (or MooShu) follower? All you have to do is click on the link in the upper right on my side bar.
Tuesday, December 15, 2009
I'd wanted a disc cutter and dapping block for a long time. If you don't know, a disc cutter will let you punch out circles from sheets of silver. And the dapping block will let you shape the discs into hemispheres.

The least expensive dapping block I could find was at Harbor Freight at $35. When it went on sale for $22.99 I snapped it up. (There it is on the left.)
BUT IT LOOKED SO COOL ON MY SHELF! And it works very well.
Next step was to find a disc cutter.

I was pretty happy at first, but it didn't last for long. After the first 6 or so punches, it wasn't cutting very well. Every disc had to be trimmed and filed. I started hating using it. In fact, I started to avoid using it. And after a very short period of time, it started to rust.


Do you want to subscribe to my blog by email? Click here!.
Would you like to be a Contrariwise (or MooShu) follower? All you have to do is click on the link in the upper right on my side bar.
Monday, December 14, 2009


Do you want to subscribe to my blog by email? Click here!.
Would you like to be a Contrariwise (or MooShu) follower? All you have to do is click on the link in the upper right on my side bar.
Thursday, December 3, 2009

Buy yourself a bench pin. Either with a V cut out, or cut it out yourself. They are invaluable.
Expect to break a lot of blades and don't get upset. Just make sure you buy lots of them. Dozens. Really.
The saw blade should be tight in the saw. I start by inserting the blade on the side of the saw opposite from the handle, and tighten the screw. Then I push the handle into the middle of my rib cage and press (ow), insert the other side of the blade and tighten the screws.
When you quickly pull and release the blade, it should "ping" . (If it doesn't, unscrew the blade, press the handle harder into your ribcage, and insert that blade in the saw taunt.)
The teeth of the blade should point down and out. If you can't see them, you can run your finger against the blade to make sure they're pointing the right way. (Now that you've checked, go back and reinsert your blade the right way.)
When sawing, remember to let the teeth of the saw do the work. Do not push the saw
When sawing, keep the saw straight and not angle it.
Most of the progress in sawing is made on the downward stroke. But it's easier to start your cut by bringing the blade up than down.
When cutting a circle or pattern, move the metal sheet, not the blade.
Use long, even strokes instead of short, quick ones. It will cut much quicker that way. EXCEPT when sawing a corner/angle. Then saw in place with short quick cuts and move the metal sheet, not the blade.
Lubricating your blade often. (I use bee's wax, but there are other products available.)
Read every article you can, on how to use a jeweler's saw.
Remember, it WILL get easier. And, who knows, you might even find that it's fun!
Do you want to subscribe to my blog by email? Click here!.
Would you like to be a Contrariwise follower? All you have to do is click on the link in the upper right on my side bar.
Tuesday, December 1, 2009
 For the longest time, I feared the jewelry saw and I avoided using one. But it you want to do metalwork, you're eventually going to need to saw some metal!
My first feeble attempts at sawing resulted in many broken saw blades. Even trying to saw out a simple figure was difficult. My circles were misshappen, my ovals were eggshaped, and my squares turned out as quadrilaterals.
So I decided that if I couldn't make a simple geometric shape, I better try something different.  Fluid forms might not be too bad - I could disguise the fact that I couldn't cut a straight line. And they're pretty interesting and make the back of a pendant seem a little bit different.
So I started cutting out wavy patterns on the backs of my pendants. After a while this got easier and I began to break fewer saw blades. The other day, I bought the cabochon you see on the right. To me, the pattern of the stone looks like trees on a mountainside, with misty hills in the background. I planned to bezel-set this stone in a pendant, and as I soldering the bezel in place, I suddenly got an idea: I would saw out the back of the bezel in the shape of a leaf!
For someone who'd never sawed anything more intricate than some rounded shapes, that was a pretty daring idea.
So I took my sharpie, drew a leaf, chose my blades, and began sawing away.
And this is what I got: (Look ma, it took only 6 blades!)
Let me tell you, I learned a lot by just doing this and I've gotten pretty comfortable with my jeweler's saw.
The pendant is still a work in progress but I promise to post some pics when it's finally done.
Do you want to subscribe to my blog by email? Click here!.
Would you like to be a Contrariwise follower? All you have to do is click on the link in the upper right on my side bar.
Monday, November 30, 2009
Mooshu Monday: friendship comes in all shapes and sizes
0 comments Posted by Contrariwise at 12:01 AM Suddenly, they're friends!
Saturday, November 28, 2009
Just thought I'd share this adorable photo. These poor little meerkats lost their mommy at 2 days of age. But with some human love, a hot water bottle, and the help of a stuffed animal, they're doing great and are now over a month old.
link
Friday, November 27, 2009

Another cabochon from my Russian dealer!
This one caught my eye immediately and I had no idea what the stone could possibly be. An incredibly bright blue, but not quite the right shade to be turquoise. I was told that it was "Swedish Slag" and came from foundries in Sweden. I bought it (and I should have bought more!) and did a little research on it.
The blue stone is actually 500-year old glass from Sweden. But it didn’t start that way. It began its life in the 1400's when metal smiths would dump the waste product from iron they were smelting. This sludge or slag which they dumped outside their shops would accumulate in piles which got buried for centuries. During that time it changed into this glass-like stone which is now being mined. Different minerals or metals would make the slag different colors. This one was probably contaminated with cobalt, creating this lovely blue color. So wearing this ring means wearing the ultimate in recycling. 14th century sludge on your finger!
Do you want to subscribe to my blog by email? Click here!.
Would you like to be a Contrariwise follower? All you have to do is click on the link in the upper right on my side bar.
Wednesday, November 25, 2009
I know a dealer who sells gemstones that come from all around the world, but especially Russia. He comes to Indianapolis a couple of times a year and I've bought some amazing cabochons from him.
During his last visit, I picked up way too much stuff (again!) and I'm going to have the pleasure of working with the beautiful stones for quite a while.
Among the items I picked up were some intensely purple charoite.
I've seen charoite before and for a while I assumed it might be synthetic because of the incredible color, luster, and swirly patterns in the stone. Charoite can be so incredibly purple that it’s almost hard to believe that this stone occurs naturally.
But they're real and they're only found in Russia.
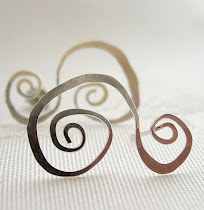
If you've seen my silver jewelry, you know that I like to incorporate swirls. But I haven't done so in a ring until know.
This design almost seemed to create itself - I guess the swirly patterns in the stone inspired me. There are swirls on either side of the stone and little graduated spheres of silver to balance the pattern.

 Rather than using a plain half round wire to make the band, I cut out heavy silver sheet to create a wide band and then accented it with spirals and stampings. Then everything was oxidized and polished to bring out the details.
I really love how the band turned out and think I have to make a band (sans stone) just for me!
(Did you get the reference in this post's title? If not, maybe the name of my ring will help. Click here to see it.)
Do you want to subscribe to my blog by email? Click here!.
Would you like to be a Contrariwise follower? All you have to do is click on the link in the upper right on my side bar.
Monday, November 23, 2009
 To me, gemstone cabochons are very inspiring. Each one is unique and each one holds some promise. Sometimes I get a stone and know exactly what I want to do with it. But sometimes I fall in love with a stone not knowing what it's destined for.
This one is one of the latter.
I picked up this plume agate from an Etsy shop called StonesInMotion. Ed has some wonderful pieces and this one caught my eye. I bet you can see why. It was collected at the Woodward Ranch in West Texas which is world famous for these gorgeous plume agates. Apparently, they're getting harder to find at the ranch these days so I feel lucky to have picked up such a gorgeous speciman.
While I loved the stone, it didn't speak to me right away. It took several months before I decided to highlight it in a ring. But I think it was worth the wait.
I didn't want the setting to destract the stone, so I decided on a simple setting. Here's the stone, set in silver, with just a little extra border that I hand stamped. Then everything was oxidized and polished to give the ring a little bit of a rustic feel which I think matches the feel of the stone.
 More pictures of this ring can be found here.
Do you want to subscribe to my blog by email? Click here!.
Would you like to be a Contrariwise follower? All you have to do is click on the link in the upper right on my side bar.
It's guess about time I started posting again! Let's begin again with Mooshu, who's now about 9 months old.
This morning, our black lab mix, Indy, dragged out an old soupbone of hers and started gnawing away. Mooshu was very interested but possession is 9/10ths of the law. And Indy's growls let Mooshu know it was her bone.
Mooshu hasn't shown any interest in his own chew bone for a while, but I gave it to him anyway. Well of course he was interested! The funny thing was that Mooshu sat right next to Indy, and both of them lay there and chewed away, best of pals.

Of course, dogs are very like people. Sometimes the other bone will always seems better.

(By the way, if you noticed the fluff on the carpet, it's from one of Mooshu's dog toys. He's been happily eviscerating a stuffed bunny for the past week and there's always new fluff around!)