Wednesday, November 19, 2008
Etsy tips for a better shop: Periodically update your photos and listings
13 comments Posted by Contrariwise at 12:01 AMJust because you've listed an item on Etsy, doesn't mean the listing is carved in stone.
I'll often go through my listings and look for opportunities to improve them or update them.
Let me give you a couple of examples.
Updating descriptions and titles Your listing description shouldn't say that your beautiful handmade item has a lovely pastel palette perfect for Easter - in September!
If you have a seasonal description, you should update it seasonally. The above was a really blatant example, but season descriptions can creep in subtly. Minor changes to make your listing "fresh" can make a difference.
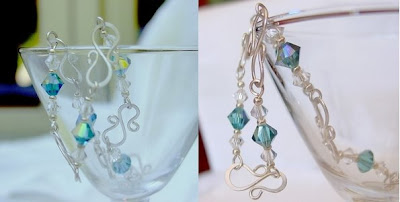
Last Christmas time, I listed the earrings on the left under the name of "Christmas Kisses", complete with a holiday-themed description. I ended up selling quite a few pairs . But I didn't want to stop listing my "Kisses" in my shop - they really can be worn any time of the year. So, after Christmas, I renamed them "Valentine Kisses" and wrote a season-appropriate description.
That worked very well and I did sell several pairs for that holiday.
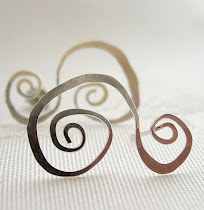
Take opportunities to improve your photos My Dangling Swirl Earrings were originally available in my shop a couple of months ago. Even though I had photographed them several times, I was never happy with the photos. On the right is my original listing photo for them. Yes, they've sold twice and I've relisted them, but I thought the photo needed major improvement.
I was recently playing around with my lightbox - changing the lighting and  experimenting with different backgrounds. I wanted a background that would complement sterling silver. I tried various colors of cardstock, pieces of wood, tiles, different types of stones, etc - then I tried a placemat with rich dark colors. (Placemat??!!) I really liked the deep color and the way silver seemed to pop against it. It also subtly evokes the holiday season.
I went back and took new photos of the Dangling Swirl Earrings and I am so happy I did. You can see the new photo on the left.
Now I feel the photos represent my earrings better - and I don't cringe every time I look at them.
Do you want to subscribe to my blog by email? Click here!.
Would you like to be a Contrariwise follower? (I love having more friends!) All you have to do is click on the link in the upper right on my side bar.
Thursday, March 20, 2008
Photos, even those showing the scale of the item, are not a substitute for the real thing. There have been many times when I've known the exact dimensions of an item and seen the photographs, and then have been surprised when I finally received it. It's either smaller or larger than I imagined, or the colors are not exactly what I had hoped for. (I do this all the time with gemstones. It's happened so often that I really hesitate to buy them online.)
We each have our own views on this. Personally, I wouldn't mind seeing jewelry - even earrings - modelled. It can give you a good idea of how the jewelry will look on. But I know seeing earrings on a live person would really gross some people out. (Me, I'm more skittish about seeing hats being modeled on people. Yeeech! But that's just me.)
- no one in my family can take a reasonable photo
- no one would want a necklace modeled on my neck. My modeling days are long past. (Please see comment above above grossing people out)
 Now I have to run and make some more new necklaces before I give Katie a decision about spring break.
BTW, if you'd be interesting in subscribing to my blog and receiving it by e-mail, just click Subscribe to Contrariwise ramblings by Email.
Tuesday, March 11, 2008
Lessons Learned about Etsy: Maybe I was wrong about blogs
12 comments Posted by Contrariwise at 1:20 PMI recently wrote that I didn't think blogs were all that great for promotion. Maybe I was wrong about that.
Etsy just published its results from their January 2008 survey. 30,000 people responded -almost half were buyers only.
I took a look at the data. 26% of the buyers found out about Etsy on blogs, and 17% found handmade Etsy products through blogs! (Still, the most frequent way buyers find out about Etsy is through a friend - 33%).
With regard to MySpace or Facebook, almost three quarters of buyers have a profile on at least one of them! And a quarter of buyers use Flickr.
My conclusions:
- I may have been wrong about the impact blogging has on promoting. I had planned to continue to blog, but now I won't be so negative about its potential use for promotion.
- I am definitely going to work on my MySpace account, and possibly look into FaceBook.
Maybe I'm going to have to invest in this:

(Hey, it's deductable as a business expense!)
You can find more about the survey results on The Storque.
If you'd be interesting in subscribing to my blog and receiving it by e-mail, just click Subscribe to Contrariwise ramblings by Email.
Friday, March 7, 2008
In this post I am only going to write about promotions I've tried (and tell you whether they seemed to work for me).
1. Business cards (5 Stars)
Get business cards made up – and hand them out to whomever you can– friends, family, co-workers, whoever. (I've actually had former customers ask me for large quantities, so that they can hand them when they get a compliment on the jewelry they bought from me.)
Add your cards and fliers to bulletin boards you have permission to use. When you ship an item sold at your Etsy shop, don't forget to slip in a couple business cards. (One for your customer, and one to hand out!)
2. Flickr account. (5 Stars)
Of anything I've done on the web, this has brought me the most sales. My tips:
- Don't forget to add your Etsy site to your profile. (Remember, you're not allowed to include it in the description in the photo. They will suspend your flickr account if you do!)
- Join a lot of groups and, every time you add a new picture to Flickr, make sure it's sent to all the relevent groups.
- Don't post a lot of photos to Flickr at once. My strategy is similar to my Etsy listing stratgey: space them out to give me the most exposure in the groups.
- Make friends. You get to see what other people post and they see what you post. Plus people surfing Flickr like to check on other people's friend lists - and you can be seen that way, too.
3. Blogging (2 Stars)
A lot of people swear that blogging is a great promotional tool and claim steady sales from their blog. My personal experience is that I have not had a single sale due to blogging. (I keep track of my stats on FeedBurner and have found that get very few clickouts to my Etsy site. In fact, while there have been over 30,000 hits on my blog, I think I've had less than 10 clickouts to my online shop! )
But you may have a different experience. If you blog or plan to blog, read all you can about increasing traffic to your site - you can't promote unless you have visitors!
Here's a great site that has strategies for using your blog for promotion: Tips for New Bloggers.
I also wrote a post about increasing traffic to your blog.
4 Deviant Art (2 Stars)
This is very similar to Flickr but I think that the people who use it are younger and artsier. I would recommend it to photographers and artists.
I have an account and regularly submit photos. Unlike Flickr, you can add a link to your Etsy shop within the description of each photo. I've found that I get a lot of views, comments, and clickouts to my Etsy shop. (I am not aware of any sales generated from this site.)
5. Squidoo. (1/2 Star)
Squidoo is a network of user-generated "lenses" --single pages that highlight one person's point of view, recommendations, or expertise. Lenses aren't primarily intended to hold content; more emphasis is placed on recommending and then pointing to content on the web, therefore they are great at pointing people to your website.
You can create a sections with photos directly linking to Flickr, links to your Etsy site, your blog etc.
I like the fact that it provides great stats on number of visitors and clickouts. I've gotten quite a few clickouts to my online shop. Since you join groups (many of which are devoted to shopping), you can get exposure to the right customers.
My gut feeling is that you need to spend a lot of time on Squidoo to get yourself seen and generate sales. So other than setting up my own lens and joining some groups, I've pretty much given up on Squidoo.
6. Craigslist (2 Stars)
This is like an internet classified ad. I've listed a few times and have correlated the listings with increased people viewing my online shop and a couple of inquiries. I'm going to try to advertise some more on it before I give up.
7. MySpace (??? Stars)
I have heard that you can get a lot of traffic to your site through MySpace - but you must have a lot of friends and join groups. Lots of people swear that they get lots of sales through MySpace. Problem: you need to invest a lot of time to create the site, update it, and make friends.
There's a great thread on Etsy about using MySpace as a marketing tool.
I have a MySpace account, but have not used it after I set it up. (OK, I confess, my son set it up for me.) If you want add me as a friend on MySpace I would appreciate it. It would force me to get more involved in it.
Once again, there are TONS more ways to promote outside of Etsy and the above is only my firsthand experience. Unfortunately, you could end up spending all your time promoting and less and less time creating. It's definitely a balancing act. So my last piece of advice is:
Track where your sales come from so you can focus your energies where they're most effective.
If you'd be interesting in subscribing to my blog and receiving it by e-mail, just click Subscribe to Contrariwise ramblings by Email.
Thursday, March 6, 2008
When I opened my online shop, I thought that I would just list some jewelry and people would come by and buy. How difficult could it be? After all, look at all the successful sellers on Etsy!
It wasn't until I started reading the Etsy forums that I realized I really had to promote my shop in order to have it noticed and to sell.
Wow! This meant commitment! I wasn't entirely prepared for that.
So I quickly read everything I could find on the internet about Etsy. Much of it was helpful and it really turned my thinking (and promoting activities) around.
I'll divide promotion into two parts. Both will hopefully result in improved sales and are only based on my personal experiences and opinions on promoting within Etsy.
- What you can do within Etsy to get your shop noticed.
- What you can do outside of Etsy to draw people to your shop.
1. List often.
If possible, list an item daily. This gets you exposure on Recently Listed Items on the front page as well as in the Time Machines on Etsy. It also means that when someone runs a search, you're closer to the top of the queue of their results. (Personally, I like to list twice a day if I can.)
If you don't have anything new, consider relisting an item. (Just don't get OCD about it. Even though its only 20 cents per listing, this quickly adds up.) In addition to bringing you back up in the queue, it brings your item to the top of your shop listings, which means more people might notice it if they're just scanning your shop. (Most of my sales come from the 1st page. I think only really committed buyers look beyond the first two pages of your shop.)
Unless you're opening a shop or are a really prolific seller, don't post a lot of items at once. Space them out during the day for maximum exposure.
2. Post on the Etsy forums.
Get out on those forums and have people see you, recognize you, and associate you with your shop. You'll meet people and see shops you wouldn't otherwise. Plus lots of good advice can be found there.
People rant about the Promotions forum, but I've sold more than a few items that way. It's not going to hurt to announce your new items in the promotions forum. You'll get some additional views (a big thing for a newbie) and you'll get your shop noticed.
3. Good photos and thumbnails
This is unbelievably critical. See my earlier posts about photography tips and drawing the customer in with great thumbnail photos.
3. Good descriptions in your listing.
Other than your photos, this is all your customers have. They can't touch your wonderful handmade item, or smell it, or taste it, or try it on. You have to describe it. Give measurements and details, state clearly what an item is made from, and don't forget to check your spelling.
Also, it doesn't hurt to have a little fun. Suggest some uses. Share your inspiration. Show some personality. And, every so often, change the descriptions. (When someone is looking at your item in March, you don't want the description referring to the wonderful autumn colors of your item.)
4.Get feedback
Ask for a critique in the Promos and Critiques forum and then genuinely consider the constructive criticism offered.
When I first started, I thought I had great photos. Most of them were created with a scanner and had busy backgrounds. Early on I asked for feedback on the forums and discovered that most people were not as enamoured with my photos as I was. I spent A LOT of time learning to use my camera to create more effective photos and am very thankful for the constructive feedback I received.
5. Proper tagging
Make sure you have the most specific titles and tags available, that clearly describe what your product is, and in some circumstances, who would use your product. You are allowed up to 13 tags; use as many as possible. It makes it easier to start with the most general tags, then narrow it down.
For example, if you sell a sweater
- sweater (item)
- wool (material)
- cardigan (type)
- cable (type of knit)
- blue (color)
- tan (color)
- stripe (design)
- medium (size)
- fitted (style/fit)
- classic (style)
- feminine (style)
- casual (occasion)
- office (possible use)
That's 13 words.
6. Pricing
I'm only giving a buyer's perspective about prices (because I could write a whole post all about how to set prices - but that's an entirely different topic):
If you underprice, a buyer may think something is wrong with your item or that it's poorly constructed. If you overprice, the buyer may think you are gouging. Either way you will lose. Check what similar items are selling for on Etsy and price fairly and accordingly.
7. Etsy Showcases
I've never featured an item in one. The consensus seems to be that they will bring your shop views and hearts, but little or no sales.
Just think, it costs $15 to have an item in a showcase. For the same money, you could relist an item 75 times! Think of the exposure THAT would get you!
My next in this series of Lessons Learned will be about promoting OUTSIDE of Etsy.
If you'd be interesting in subscribing to my blog and receiving it by e-mail, just click Subscribe to Contrariwise ramblings by Email.
Wednesday, March 5, 2008
It took me a lot of trial and error to get my photos to an acceptable stage. (I say "acceptable", because there is always room for improvement.)
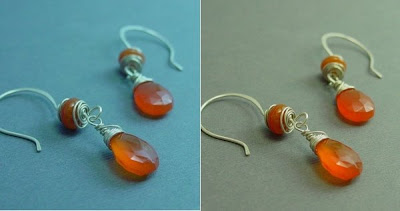 Makes a huge difference, doesn't it. Not only is the background close to the original color, but now the gemstones really "pop".
2) Control the exposure time of your pictures. This is useful if your photos are extremely washed out (too much exposure) or dull/dark (too little exposure). The range on most cameras is -2 to 2 and is usually set to 0 by default. A setting of +1 is a good place to start.
Here is an example in a lightbox. The exposure for the left picture is +1, the middle is 0, and the right picture is at -1. Depending on the ambient lighting and the background, the optimal exposure will vary.

In this case, a setting between +1 and 0 would probably be best.
3) Use optimal lighting. Natural diffused daylight is best. 2nd best is a lightbox. (Never use your flash, at least on jewelry- it can create a one dimensional washed out look.)
Get a lightbox or make one. Then you won't have to rely on the sun all the time. It's easy to make one; here's a few links.

4) Use the macro setting on your camera if you are photographing small items or want to take detailed close-up shots. (The icon is a little flower.) This setting helps your camera focus on small details within your image. You will either need a really steady hand or you might consider using a tripod.
Here's an example of the kind of detail you can get with the macro setting. Guess which picture was taken using the macro lens setting!
 With out the macro setting, I would have to take the photo several feet farther from the item. I would lose detail, even if I cropped the photo severely.
5) Use a photo editing program. A photo can be saved with cropping and brightening. Some things I usually use to improve my photos are increasing contrast, gamma correction, increasing or decreasing the saturation, and sharpening.
Photoshop is a great program for editing. But some free (and simpler) programs include Picassa and Photofiltre.

This made a huge difference. The colors in the background and in the rose quartz stone are now true. The result is that this photo almost doesn't look bad!
Here's a few great examples that I found on Etsy. (You might be able to recognize a couple of sellers from their photograpy.
 If If you find something that works, stick with it. A lot of successful sellers have unique styles that make them instantly recognizable. (I haven't acheived this yet, but I'm still working on it.)
7) Look on Etsy for ideas! There's a lot of great inspiration out there.
If you'd be interesting in subscribing to my blog and receiving it by e-mail, just click Subscribe to Contrariwise ramblings by Email
Monday, March 3, 2008
Selling on Etsy: using your photos to draw in more views
13 comments Posted by Contrariwise at 8:41 AMI think everyone has heard the saying, the 3 most important things in real estate are location, location, location.
In my personal opinion, there should be a parellel saying in Etsy: The 3 most important things for selling on Etsy are photos, photos, photos.
Not just any photos. They have to be really good. The problem with buying online, is that your customers can't see or touch your wonderful handmade items in person. All they can see is your photograph and read your descriptions. So good photos are VITAL to making a sale.
You're allowed up to 5 photos in each Etsy listing. Why not use them all? Take pictures at all angles and make sure they can see the entire item. This can only help your customer understand how wonderful and unique your creation is.
Make your primary photo, the one they see when they're browsing your shop, interesting. It should draw people in. You don't necessarily have to show the entire item in the photo. You can tease the viewers and make them want to see more.
One way to gauge how good your photos are, is in the number of views you get immediately after listing an item. Better and more interesting photos will get more views.
Here's an example of what I mean.
This is my primary photo for my Grape Gumdrop Earrings. This is the photo that you see in my shop listings. It's interesting and colorful and makes you want to see more. When you click on it, it takes you to photos that show the entire item:

 These photos are not that artsy or fancy, but they give you a clear idea of what the entire earrings look like, how they would hang, and approximately how big they are.
Tomorrow's post will be on how to take better photos, something I had to learn the hard way.
If you'd be interesting in subscribing to my blog and receiving it by e-mail, just click Subscribe to Contrariwise ramblings by Email
Saturday, March 1, 2008
I've been selling jewelry on Etsy for about 5 months. I've really been surprised at the number of pieces I' ve sold. Right now I'm averaging about a sale a day! That may not seem like a lot to most people - I'm definitely not making a fortune. But I didn't intent to support myself. I was just hoping to break even on the costs of a relatively expensive hobby. Plus, Etsy was an easy first step in learning about selling on the internet.
In case you're interested in which are my top selling items, the top 3 sellers in my Etsy shop are:
1. The Unfurling Earrings 2. Minimalist swirls